Picasa - Remote Photo Editing

Picasa - Remote Photo Editing

We love traveling to remote places, taking lots of pictures and sharing our experiences through our Blogs. One of our main issues is the lack of internet access because most photo sharing sites force you to make collections and albums online.

Picasa is great because you can add captions and tags, edit and organize your photos into albums all without internet access. You can even Geotag your Picasa photos in Google Earth while it is offline. Then once you find an internet connection you can upload your photos to your Picasa Web Albums and easily turn them into BlurbBit Albums that you can add to your Blog Posts.

Picasa is really two tools, Picasa which lives on your local computer (and manipulates your local photos) and Picasa Web Albums which manages photos you choose to upload and share on the web (BlurbBits uses these). Note: BlurbBit references to Picasa relate to the shared web albums.

Upload via Direct Internet Connection

If we have a direct Internet connection we use Picasa Upload (from your computer).

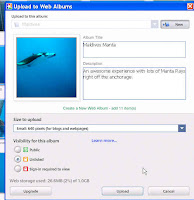
Choose or Create an Album, Select the Image size. Since we usually only use the photos for our blog, we use the small size to save space and prevent printing of our photos.

Upload at Internet Cafe

If we don't have direct access, we use Picasa Export to save the selected photos to a new folder.


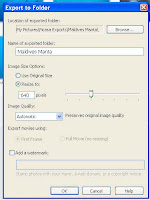
Then we copy the directory to a USB stick. Once you are at the internet Cafe, Log onto Web Albums and use the Upload button. Select or create a new album and add the files from your stick, it's a little slower this way but sometimes it beats lugging your computer to the Cafe.
If you use Flickr or another photo sharing site, use Picasa Export to save the selected photos to a new folder. Upload the photos from the new folder using your sites uploading instructions.

MoBlogging and Photo Maps

Picasa Web Albums supports email upload or you can use Blogger to upload your blog text and photos from a remote location. Check out the details here.

Photo Album and Map

Once an album is uploaded you can map the photo albums. This is much easier than geotagging ALL your individual photos (we support both). We also make it easy to build a BlurbBit (w/Map + Photos) using the BlurbBits Mapr. If you add the resulting BlurbBit to a blog post, we use it to determine the posts location. Once we have the posts location we can map that too, all that from a single mapped Picasa Album!! If you add/modify the photos or change captions/notes to photos in the album, all the changes will appear in the BlurbBit automatically.

Note: the same process can be used remotely with any non-web based photo editing tool that saves Exif data (like Adobe Photoshop Lightroom) . Test a couple of photos (raw vs jpeg) to make sure you have complete data (captions and geotags) before going too crazy. We do need the photos online (Picasa or Flickr) to gain access to them. Picasa has good synchronization between your photos on the PC and the Web Albums.

Migrating Lat/Lng to Blogger Geotags

Migrating Lat/Lng to Blogger Geotags

I have been following Blogger's announcement Blogger in Draft: New feature: Geotagging and noticed that some users are having a hard time finding their exact post locations. I have also seen various informal "geotagging" techniques used around various Blogger sites; Google Maps, Google Static maps, KML/KMZ files or text input and all geotagged photos contain the lat/lng data within the Exif data. All of these methods require knowledge of the exact Lat/Long for the marker (ie. post location). Since all of our Sailing Blogs are tagged with Lat/Lng, I thought I'd detail the migration path.

Blogger-in-Draft Location Editor


Enter a space separated Lat Lng pair into the search box of the Blogger-in-Draft location editor and click Search. This will zoom the map to the correct location but leave the Location link name blank. Zoom out (using the - button), the Location link name should now appear.

Adjusting the Location String

The Location string is determined via the reverse geocoder which will sometimes result in Unknown Location. You can adjust the Location name by clicking on the Location Link under the search box (next to Location:) and entering the desired Location text.

When I first tested direct lat/lng entry it didn't appear to work correctly (user error? Bug Fix?). Sometimes the result would shift back to the reverse geocoded result instead of the Lat/Lng in the search string.

Finding a Lat/Lng

There are lots of ways to get the Lat/Lng of a location/address including Wikipedia (good for tourist locations) or by extracting the data from geotagged photos (from a mobile device or automatic geotagging software).
Cool Things To Try

Cool Things To Try

Here's some cool things to try with BlurbBits

This assumes you have a little understanding of how BlurbBits and the BlurbBits Mapr work.

Fun with Photos

One of the main reasons we go though the effort of selecting, organizing (tagging and captioning) and cataloging our photos (into albums or sets) is for our own enjoyment. There is nothing like an album of your favorite photos to stir up some memories to reflect on past adventures.

If you don't have a blogger account sign up for one. It's easy and you'll be Blogging in two minutes.

BLURB-THIS - a BlurbBit & Blog for a Picasa Album:
&picalbums=SailBillabong
Photo albums from SailBillabong (try your Username)
  • UserName is your Picasa login name
    Login and check the path http://picasweb.google.com/UserName
    ex: use SailBillabong for ...com/SailBillabong
  • Learn More
Open the Albums by clicking the Icon and make sure some albums are found for your account. You are also welcome to use ours as an example.

Now run the BlurbBits Mapr with the album URL parameters from above (replace the & with ?). ex: ..setup.html?picalbums=SailBillabong

This will load the Picasa albums in the sidebar and place those with a defined location on the map (ah the glory of data re-use). Click on an album and if it is not already placed, drag it onto the map and click to set the location (and current zoom). If you are using this album to define a Blogs location adjust it as needed. This is where it helps to use the LLZ to pin point the location/zoom and then drag the album to it. Adjust the zoom level if needed; find the zoom level you like and use RMC set Zoom. Adjust the Map or Photo Parameters as necessary (don't forget toggle to update). Try adding these for a start &mark=midredx&smark=tinyred (append to the end of the extras line) . Preview your BlurbBit, open the photostrip and select the photo you feel best summarizes the photos or thoughts. Make any adjustments and re-Preview. Once satisfied, select the i (info) button and click the BlogThis button.

A Blog Your Bit popup will appear. Click the Login button and login into your Blogger account (you only need to do this once). Choose your Blog (if you have more than one) and then write your post; add more details about the trip, add any reflections you may have had or just describe the album. The BlurbBit will replace the [BLURBBIT] tag, so feel free to add text before and/or after. Select Publish Post. The unformatted blog will appear below as a preview, select the link to navigate to the actual blog post (or view Our Sample result .. cheater).

Now that wasn't that bad, you've got a blog post describing your trip or photos, an entire albums worth of photos, complete with captions, geo-photo map, notes and a link to the Picasa photos online. If you have your photos tagged (or in sets via Flickr) you can easily filter them to a specific topic or location that you want to write about. Filter your Photos and write your Blog or write your blog and then find the photos that match your topic.. it's that simple.

Then slice and dice the results into different views...

Interactive Examples:
&blogger=blogsmapr
A Blogger map for blogsmapr.blogspot.com
&blogger=blogsmapr&bp=1
A Blog Album (blogs with photos only)
&blogger=blogsmapr&mv=where&mi=in
A BlurbBits "Where" Blog map with link to latest post and last known location.

And ..
An interactive Blog navagation map with similar viewing options (last location or full view).

When you are finished with the Album don't forget to unset the update toggle or you will overwrite the other albums on subsequent previews. In most cases the update toggle is a good way to set the default preferences for many objects. Picasa albums are the only objects that come pre-configured (so far).

If you want to add a path or route to your album, use the RMC to set the map to add line mode and use left mouse clicks to draw your line (use RMC to stop adding points). Then select the entire path description to the right of the Preview BlurbBit Button and copy it (CTRL-C or RMC copy). Select the album and paste the new path at the end on the Extras line. Don't forget to replace the ? with a & (we'll remind you). Make sure the Select Toggle is enabled and Preview your new addition. Double check your photo maps if you changed the zoom of your album location. If the line doesn't appear make sure the Select toggle in On!! (My Sample Route result).

Now you added a travel map and favorite, last or average position to all the photos, not a bad way to enhance your blog. It doesn't stop there, if you have more than just a blog, you can map ALL your webpages. Here is all of our SailBillabong journals, photo albums (the old way), videos and our blogs (automatically updated).

If you are using a public machine don't forget to logout of your Blogger account.

An interactive Trip Photo Album map

The good thing about maps is they give users a really good sense of your travel destinations. The bad thing is you need to define where you were in order to build them. If you already have geotagged photos they'll automatically appear on the Viewr map. If not ..the thought of geotagging 25,000 photos is mind boggling. The good news is you don't really need to geotag every photo to map them, just the albums or your own web pages that display the photos.

Picasa albums are really easy because you only need to set one location per album and we automatically convert the album into a BlurbBit with all the photos.

Run the BlurbsViewr with your Picasa Album
ex: .../blurbsviewr.html?picalbums=SailBillabong

Your albums will appear with the latest album highlighted. When you open the album (select from the list, click [more] or double click on the icon) the BlurbBit for album photos will open in the window below. Quick and easy way to navigate all you trip photos eh?

There's more.. if your albums represent a single trip (like ours) you can create a rough Travel Track with the date and location of the albums. Add &tt=travel&mi=out to the BlurbsViewr album parameters (or Try Ours).
ex: .../blurbsviewr.html?picalbums=SailBillabong&tt=travel&mi=out
You'll find out VERY quickly how accurate your dates and locations are. Highlighting the Trip Summary will display the approx distance Traveled.

If that's too much work to clean up, you can draw the lines in the BlurbBits mapr and save them to a Google Spreadsheet. See our Example with Drawn Tracks. These paths can also be used when creating a standalone BlurbBit of just the album to embed on your page.

The ultimate trip photos map.. all of our individual geotagged photos and our drawn lines or you can overlay them with our actual GPS tracks (from KML).

Remember if you don't use Picasa albums you can still use the ScratchPad to enter your data for each page and then use a GoogleSpread sheet to extract the data for the Viewr. You can even combine your photos and your blogs on the same map or heck do everything. Don't forget the best part, any changes or additions you make (to extracted data) will be updated on the map. As we add BlurbBits to our new Blog Posts they will automatically appear on the map, we don't have to do anything!! Yes!!

GeoTag and Educate with Wikipedia

We like to share more than just our photos,blogs and journals. If you've read our Blog you know we frequently refer to Wikipedia articles so that reader can learn more if they are interested. A nice quick introduction through our travels with some notes, to a full on encyclopedia at the ready.. the reader can choose!!

Wikipedia is a great free online encyclopedia FULL of information AND geotag data. Most geocoding services are focused around address etc but Wikipedia covers almost everything. I've found Suwarrow in the Cook Islands (no full time inhabitants) and Niuatoputapu in Tonga both rather remote by modern standards of travel. They even had Onotoa the first place we went that wasn't in our Lonely Planet.

Go to the Main Page and enter a search string in the left hand side. Find the article you are looking for and note the top right hand corner. If there is a globe with a link click the link to open the Geo Hack Page. Look for Coordinates (second line) and enter the decimal value into the BlurbBits Mapr Center Lat,Lng,Z: text box, and select Move. You can also enter the decimal value directly as an &llz= parameter (add a ,zoom value if desired).

This is a great place to search for more information and who knows, you might even learn something while you're there. Save the path so you can add a link to your blog/website. If you find an article that doesn't have a reference but you find one, consider adding it to Wikipedia.

The Ultimate Off Line GeoTagging Combo

We use Google Earth at Sea on Billabong (without Internet!!) to help in areas where charting is poor. It is amazing how good the imagery is, you can clearly see most reefs and in some cases you can even find the sandy patches where you want to set your hook. First you must visit the areas you are interested in while connected to the internet. Keep an eye on the Streaming indicator which appears just below and a little to the right of the Earth. When this indicator has reached 100% the imagery you're viewing is fully loaded and saved to your cache. Increase the cache size to get the most out of your data and you can even use the Touring Places feature to automatically store data based on a set of placemarks (ie. Markers) you setup.

As if that isn't cool enough, Picasa has a geotagging feature that works directly with Google Earth. You can even use your saved GPS tracks to import into Google earth to help find the date/time and position for your photos. There is even a program that does it automatically. The problem is most people either don't have a GPS or haven't saved their tracks, so the manual placement mode via Picasa/Google Earth is necessary. The good news is once you've done it, the data lives within the photo as metadata so tools like Picasa and BlurbBits have access to it.

If you have GPS tracks saved and want to get them into Google Earth check out GE GPS import (for the non free versions) or look into the ultimate GPS Utility (in and out of MaxSea, Google Earth etc) or a online translation program called GPS Visualizer. In most cases GPS data stretches the limits of the Static Map APIs 50 Point, however we are working on some potential solutions (Douglas-Peucker algorithm) but will certainly support it in our interactive maps (we've got 28,500 nM of GPS tracks.. We'll make something work).