BlurbBits (an introduction)

BlurbBits (an introduction)


Sharing your travel adventures can be a time consuming experience. Writing updates, journals, editing/organizing and selecting photos/videos, adding captions, mapping locations, tracking your travels and then formatting them all for a website, blog or email can sometimes become overwhelming. We've been Sailing for 5 years and have over 25,000 photos, 30,000 miles of GPS tracks, blogs, websites and videos, so we understand the need/importance of easy to use methods for sharing your travel adventures.

BlurbBits is a FREE set of utilities designed to help ease the entire process, while providing easy to share viewing/mapping options even while you are disconnected from the internet (95% of our Sailing Blog posts were emailed). We are trying to revolutionize self published Travel Blogs, Sailing Blogs, and Photo blogs by using existing best in class functionality (Blogger, Google Maps, Picasa, Flickr, YouTube etc).

Spend your time sharing the moments, not formatting them.


BlurbBit Examples

We've designed our geoblogging process around a simple (but performance optimized) BlurbBit that can be used to add a map of your location or a map and photos in a single step instead of adding photos/captions and maps one by one.


Mapping Options

Once we have the location you can extract your current location, track your travels, create a Blog Album, and build an interactive map, all views will be automatically updated as you continue to share your travels.


Extracted BlurbBit Examples

BlurbBits can be added to a website, blog post or sidebar and emailed or linked into existing sites and social networks to optimize your sharing options.

To see BlurbBits in action visit svbillabong.blogspot.com. To learn more check out BlurbBits basics, our getting started overview or if you are already familiar with Blogger, the geoblogging process, if you can send an email.. you can blog and map!! Update: the easiest way to get started with Blogger is to add the Dynamic GeoBlog gadget and add Lat/lng text to the Blog posts you want to map, we'll take care of the rest. Check out our utilties and other examples.

Sharing Your Travels (without Internet)

Most travelers don't have the luxury of constant or high speed internet access to manage a blog/website and photos. You enjoy the experience, take some photos/notes and then the work begins. If you use Blogger you may already know about the Mail-To-Blogger interface. We write 95% of our blogs this way. We use a lat/lng string to define our location and can even send a small (250x250) photo if the email utility supports attachments (this gives people an update, a location map and optional photo). We edit/tag and caption our Photos in Picasa remotely while traveling or at sea/anchor. When we get connected again, we upload our favorites to either Picasa or Flickr and add a BlurbBit (with map) to the remotely emailed blog posts (since developing BlurbBits we've starting adding more photos to our blogs). Since a BlurbBit is a single widget, it can also be easily added after the fact.. write first, then edit/caption/organize your photos and add them when you are ready OR you can highlight photos along with any thoughts/reflections you've had to create a new trip summary. All of the extracted views and maps will be automatically updated with new entries or changes.

If you use Picasa or Flickr, you know about free online photo sharing websites. They manage the disk space, backups & organization and allow users to search photos by albums, sets and/or tags. BlurbBits uses this data to extract a collection of photos that can be added directly to your blog or website (or emailed etc). If changes are made to the photos or more are added, they will automatically appear in your BlurbBit (on your webpage). Adding a location, adds a map along with the photos AND defines the blog posts location so we can map it all!!

If you have another website, a blog is an easy way to keep people updated on your most recent travels without falling behind. If you have your content scattered around the web it can be hard for your readers to find it all and follow your adventures. You can still keep your existing site, in fact you can combine all your sites together into an interactive navigation map that allows it ALL to be viewed on a persistent map along with your travel track (actual or estimated). We manage the map and flip through the pages on your blog/sites. You can even generate a Blog Album to add to your existing site.

If you are simply not into blogging you can keep a simple travel log that allows mapping from a text file (interactive version) you maintain on your computer (it must be uploaded to Google Spreadsheets to gain web access). If you don't know your exact location or zoom level leave it blank, it is the Mapr scratchpad format so you can load it and easily map/adjust your locations there.

We will constantly be adding new functionality and notes, so keep checking this blog.

Traveling Tips

We also run creative-cruising.com with lots of helpful Travel/Sailing tips about what works for us out here including Computers@Sea (backups, utilities, supplies AND using Google Earth without internet) and for you cruisers some Sailboat specific fishing tips!!

Feel free to contact us if you have any questions.
Example Sites, Blogs, and Photos

Example Sites, Blogs, and Photos


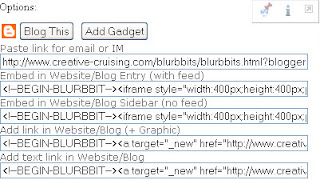
We've searched the web for data and examples of other lat/long geo-tagged sites. We wanted to show that nothing special is needed in order to map sites or photos.. in fact all of these sites had no idea we were even doing it (ie. it's not that hard). If you want to see how we use BlurbBits, check out our sites (the menu at the top of this page). If you would like your Blog or Photos removed from our examples please contact us.

The easiest way to get started is by adding the Dynamic GeoBlogs to your Blogger blog and then add the lat/lng text in the correct format to each post you want mapped. Remember it's easy to do it one by one but harder to go back and do them all!! We've also noticed that some Bloggers don't take advantage of Mail-To-Blogger posting option (see MoBlogging), 95% of our blogs were emailed from sea. Some of the posts are just simple status updates: with a location (and map), a quick blurb, and a small photo that helps describe our trip (see our Red Sea Blog Album or recent wanderings in the sidebar). All are easily extracted from our blogs with a defined category.

You can also map your Free Picasa Web Albums, and use Picasa to edit your photos while you are disconnected from the internet (see Remote Editing). We support other online photo options (including Flickr) and extract data from various sources (blogger, most georss/rss feeds, google spreadsheet, winlink). The interactive map views also includes Wikipedia and Panoramio photos, available under the Map Type/Options Pulldown menu.

Zac Sunderland

This was the first blog we started tracking during our development.. we've been tracking Zac since July 2008. You can follow Zacs trip through a Trip BlurbBit or through an Interactive Tracking map.

Update July 3rd: Zac is almost done with only 700 nM to go (after completing over 24,000 nM) that's more than 27,500 miles to you landlubbers!! All at a little over 5 mph. The best way to Track his trip is though the slightly custom TrackZac interactive map (it adds a days at sea and to go counter which is off by 500nM). I really wish I could get them to add the dynamic geoblog maps like on our Sailing blog. It's really helpful to see where we were in a certain year, month, or by 
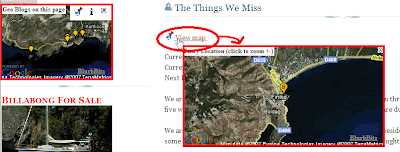
label (ie. Indian Ocean). Add the automatic popup maps within the post help the reader answer "where is that?".

Roz Savage

Roz is rowing across the Pacific (after already crossing the Atlantic). She just started blogging on Blogspot (since Hawaii) but she does all the right stuff to make our geoblogs and post location extraction work.

Examples: The Trip Tracking BlurbBit or through an Interactive Tracking map. The Where's Roz (full) and Where's Roz (sidebar), isn't that exciting (because she's in the middle of no where) but it can easily be installed on a blog and it points to her latest post at the bottom (open the link in a new window and click i for details). I could do one like I'm Tracking Zac but I'll wait until someone asks for it.

Update 8/27: Roz is still struggling, now header for Tuvalu. I pull the location information directly from the Blog text so it is subject to Human error (or syntax changes). The last couple of posts had syntax issues that prevent correct extraction), I could fix the data externally but I can't update Roz's blog.

Update 8/01: You can see her latest struggles to cross the equator here (map of last 20 posts). She is torn between two Route Options, Tuvalu to the South or Kiribati to the north (the final leg will start next year from her destination). Up to now she has been rowing with the NE tradewinds mostly behind her , as she heads into the South Pacific the winds will turn East and then the SE tradewinds will fill in and move towards her bow pushing her off course instead of helping (Winds are shown as yellow lines on the map). One of our toughest sailing legs was the 1800 nM from Majuro to Fiji along a similar route.. We have a six foot keel and will keep moving when one of us sleeps (Roz doesn't).
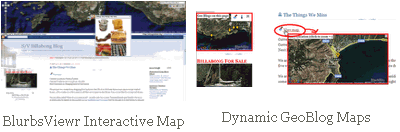
Cruising World- Alvah Simon's Blogs

View a BlurbBit Summary Map or interactive Blog Map.

The flexibility of BlurbBits and our interactive BlurbsViewr maps allows us to map existing pages without changing anything on the original site. It's also a great way to tie together multiple sites (and data) if you decide to add a new blog to your site (and why wouldn't you?).

Virgin Global Row

Here's one for ya.. This guy is trying to row around Antarctica and I thought sailing was hard (at least we get to lay there AND move forward).

BlurbBit Blog Map or an Interactve Blog map. (extracted from GeoRSS).

17 days with ONLY 305 miles covered (18,000 nM is the predicted distance and it is expected to take 18-22 months). This will be one to follow.

Google just announced it yesterday (The rowboat and the cloud) and you can follow it on Google Earth.

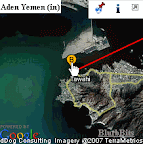
You can also get the latest position and blog link through a Where? BlurbBit. You can install it on your own blog/website (click i for Info). Add &mi=in to initialize with the in View. You can also view a Blog Album and see the photos, location map and summary of the blog (some photos appear empty ??).

Sandpiper38

Sandpiper uses a modified version of Lat/Lng text so the map will be automatically updated when they add new posts ( View BlurbBit). Sandpiper uses the same technique we use on our blogs.. both quick status updates and full blog posts are combined in the same blog.

BlurbBit Blog Map or the Interactive Blog map

We did find some incorrectly defined lat/lngs that we've manually adjusted, hey when you can't check them how do you know!!

Sailing with Matsu

Matsu uses a Lat/Lng string to define their post location so the map will be automatically updated when they add new posts ( View BlurbBit).

BlurbBit Blog Map or the Interactive Blog map

They also use Picasa albums. Adding a location to each album would allow them to include the albums on their map, along with their blogs.

Yacht Doris

BlurbBit Blog/Albums Map or the Interactive Blog/Albums map including travel track.

Simon investigated sailing as a interest in 2007, bought a new boat in Feb 08 and took off in the Fall .. and sailed Single handed across the Atlantic. wow..

Simon already has a map on his blog but it doesn't change as you navigate the pages so we pay a performance penalty with no gain (a link would be better, BlurbBits dynamic geoblogs would be the best). He also uses Picasa albums to add photos to each post, sometimes the slide shows plays automatically and slows down the blog. We would recommend he changes his Lat/Lng format slightly (move N and W to the end of each section) so we can automatically map the posts. If he adds the location to the picasa albums we can automatically map those and I would switch the slideshows to BlurbBits and/or more them to the read more section with the new Dynamic GeoBlog functionality.

Ohana Kai

BlurbBit Blog Map or the Interactive Blog map

They actually have three sites including two blogs.. the two blogs are combined above. They only seem to use the blog to track their adventures while at sea (like we did originally) but their 
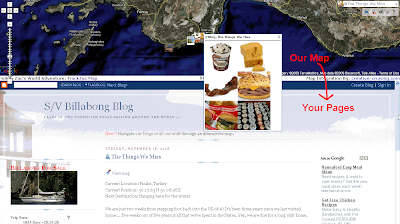
latest post shows where they finished their Atlantic Crossing. We've found it much easier to match our Picasa and Flickr photos to our blog content and have started to add more photos to our blog since using BlurbBits. A picture is worth a thousand words but sometimes it helps to have some blog text to back up the photos (like our snaps360 blog).

Dick and Libby Tarwathie

Dick and Libby use the same lat/lng format (for recent posts).. so we can automatically update the map based on their latest blog posts.

BlurbBit Blog/Album Map or the Interactive Blog/Album map

More BlurbBits: Recent Blog Posts, Picasa Albums (mapped)
A Picasa Album (from a mapped Picasa Web album)
Winlink Latest Position last 15 reports

We've been working with Dick on some timeout issues that sometimes occur (with slow connections and larger pages?). I would suggest using the new Dynamic geoblog features to highlight the locations since it requires much less bandwidth and no dependence on external feeds (like photos or tracking maps). I would also recommend adding BlurbBits as links (to get dynamic popups) and/or adding them to the fullpost section along with standard Picasa album links for those readers who want to go straight to the Larger size photos (and have a great internet connection). It's a great way to keep the performance optimized and provide in blog maps and photos.

Sunshine

Geotagged photos with optional track overview and last location.
Geotagged albums Click Open link to view photos in album.

Interactive maps
  • Blogs/Albums and Track
    The blogs have D M S so the positions might be slightly off..
  • Geotagged Photos and Track
    Most people don't take the time to geotag each photo (we do), but the resulting map is a good tracking method. The geotag becomes part of the file and can be re-used in all programs that read the data.
We would move the slideshow to a post and add a link (or even a popup BlurbBit). Wanna talk about small world.. I was checking out their Blog (testing this) and saw my buddies boat (it's the nice Tri), who just stopped by while driving it cross country!!

SV Rachel

BlurbBit Blog Map or the Interactive Blog map

In order to map their blog locations they just need to adjust the location of the N and W to conform to our format (DD MM.MMM [N|S] DDD MM.MMM [E|W]) hey we have to choose one. Even using this syntax we've found positions that don't map correctly in other blogs (extra characters, no spaces, multiple W etc). It may be easier to use the llz=dd.ddd,dd.ddd,zoom format.

They could also add our winlink blurbbit to the sidebar.

Winlink BlurbBit latest and recent positions

SV Mary Elizabeth

Picasa Photos albums with optional route summary.

BlurbBit Album Map or the Interactive Album map with route and additional track points.

Some suggestions.. I would remove the photos, the map and the slideshow from the sidebar, and move them to posts (with links) or popup BlurbBits. See gadget overload for more details/reasons. When testing performance make sure you clear your browsers cache before reloading (see Dynamic GeoBlogs), this will reload photos in your cache and give you a true sense of the loading speed people will experience the first time they visit (or see new data).

SoggyPaws


BlurbBit Blog/Albums Map or the Interactive Blog/Albums map

Soggy Paws maintains a couple of custom BlogSpot template blogs. The position format must be changed slightly (change - to space) to make the above maps automatic.

Wordpress

Wordpress doesn't allow javascript or iframes within WordPress but you can still map blogs if you put the correct lat/lng format.

Last Location or the BlurbBit Blog Map or the Interactive Blog map.

Wordpress does not support dynamic configurable feed lengths, so you'll only get the number of posts set by the user.

Mapped Picasa Albums
..

Picasa allows you to map your photo albums, it's a good way to let people know where the photos were taken (without having to do them all). We like to geotagged all our albums and photos so they appear on maps no matter how we filter them.

Click the BlurbBit link below to get our Albums. Clicking on the Geo-Photos button (top left) will show the album locations. The selected albums location can be seen via the Location Map button (side menu). The album summary is available via Notes and the photos IN the album can be seen via the open link button. Since we load the content from Picasa, any changes and updates automatically appear in the Widget, it's the best way to add all you albums to the side bar.

SailBillabong (ie. Us) BlurbBit Picasa Albums or the Interactive Picasa Albums map with travel track enabled.

Each album (Red Sea Album w/Location) can also be added to a blog entry AND photos can be filtered by tags to match content or highlight your favorites. Tag a new favorite and it will automatically appear in your BlurbBit (and your Blog). Check out Using Online Photos for all of the available options including Flickr. Visit our Sailing Blog to see how we use BlurbBits for our Flickr Photos, or our 
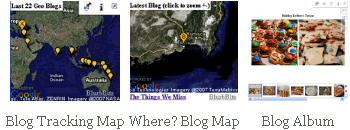
Photo Blog to see how we add maps to highlight our standard photos. You can also generate a Blog Album which summarizes your blog photos and locations (click Note to read a Blog Summary).

Here's a collection of some albums we've found.

juliemays BlurbBit Picasa Albums or the Interactive Picasa Albums map.

cruzingmurphs BlurbBit Picasa Albums or the Interactive Picasa Albums map.

jaramanpotter BlurbBit Picasa Albums or the Interactive Picasa Albums map.

svenvy BlurbBit Picasa Albums or the Interactive Picasa Albums map.

svtaipan BlurbBit Picasa Albums or the Interactive Picasa Albums map

Ascension BlurbBit Picasa Albums or the Interactive Picasa Albums map.

svtweed geotagged photos of Andaman Ilands. BlurbBit Picasa Photos or the Interactive Picasa Photos map.

svsilverfin BlurbBit Picasa Albums or the Interactive Picasa Albums map.

svcrystalblues BlurbBit Picasa Albums or the Interactive Picasa Albums map.

kestertonm BlurbBit Picasa Albums or the Interactive Picasa Albums map.

largostar BlurbBit Picasa Album Map or the Interactive Picasa Albums map.

travellerkelly BlurbBit Picasa Album Map or the Interactive Picasa Albums map.

Martin.Schaerer BlurbBit Picasa Album Map or the Interactive Picasa Albums map.

chmonkey BlurbBit Picasa Album Map or the Interactive Picasa Albums map.

nancymeridian BlurbBit Picasa Album Map or the Interactive Picasa Albums map.

hsalvenmoser BlurbBit Picasa Album Map or the Interactive Picasa Albums map.

dylangv BlurbBit Picasa Album Map or the Interactive Picasa Albums map.

scrivin BlurbBit Picasa Album Map or the Interactive Picasa Albums map.

mhbscv BlurbBit Picasa Album Map or the Interactive Picasa Albums map.

johng100 BlurbBit Picasa Album Map or the Interactive Picasa Albums map.

Balvenie Picasa:BlurbBit Picasa Albums or the Interactive Picasa Albums map.
Balvenie Blogs: BlurbBit Blog Map or the Interactive Blog map.
Getting Started - BlurbBits Utilities Overview

Getting Started - BlurbBits Utilities Overview


We've been adding a lot of new functionality and documentation so it's time to try to answer the question: What is the best way to get started with BlurbBits?

First make sure you've read our introduction or the BlurbBits Basics to get a high level understanding of our basic capabilities and concepts. It also helps to understand how to create a BlurbBit (url parameters, our interactive examples and publishing options). Remember our goal is to reuse as much information as possible, so check out our data extraction parameters before you start. We even document a complete geoblogging process but it helps if you understand the high level summary first..

BlurbBits - summary

BlurbBits are performance optimized map and photo sharing solutions for your blog or website. Standalone BlurbBits define a map and/or set of photos for a specific location or topic (the bits). Instead of adding photos one by one (a major hassle) and/or linking to a separate map or photo album, BlurbBits can be used to quickly add all the photos/map into a blog or website. Photos and maps are viewed directly within the BlurbBit on your page without forcing users to other sites or pages. Extract BlurbBits summarize data from various sources into overview maps and/or albums depending on the parameters.
  • Quick customized maps (standalone)
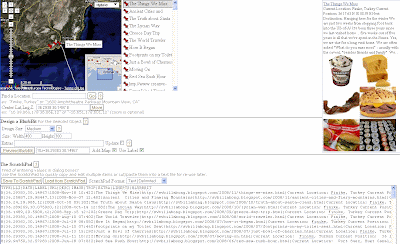
    You can adjust markers, zoom levels, location, travel path, map type and initial view. These parameters are also used to customize extracted maps. Location maps (&llz) also define a blog post's location when added to an individual blog post.
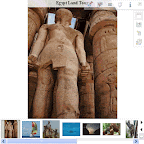
  • Online photos (picasa or flickr)
    Manages multiple photos from Albums or sets, with or without geotagged data from a user, group or other public data (does NOT define a blog post location). Changes made to the online photos will be seen when the BlurbBit is reloaded, automatically keeping your blog photos up to date.
  • Combined Maps and Photos
    The parameters from the sections above can be combined into a single BlurbBit which shows photos and defines a blog post's location. This can be used to manage all the photos and map for your blog post in a single utility (ie. widget/gadget) while allowing us to map your blog posts.
  • Summarize Data
    Create summary maps/photos from existing data using extraction options. Note: extracted data cannot be used to define a blog post's location, it must be defined using the LLZ map parameter (or via the mapr).
  • Publishing Options
    BlurbBits can be added to your blog (post or sidebar), website or emailed and linked using our publishing options. Use the Embedded Options (and Blogger BlogThis) to add a BlurbBit into a blog or website. Links can also be used in sites/blogs that don't support javascript. Our Gadget overload post might help you understand our thoughts on post vs sidebar publishing.

Utilities & Tools


BlurbBit Interactive Examples (in this Blog)

The interactive examples of the various sections can be used to learn about a specific set of BlurbBit features. Click on the icon to see the BlurbBit. Text entered in the textbox will be passed as the BlubBits URL parameters. Most parameters can be combined with other section parameters.

Design Mode (within a BlurbBit)


A BlurbBit in design mode displays the publishing options for the i (info) menu button instead of the standard info/sharing options. The interactive examples and the BlurbBits Mapr automatically enable design mode. Url parameters can be manually appended to the BlurbBit Url and published using this mode.

Dynamic GeoBlog Maps

Blog Before Dynamic Maps

Blog After - with Popup Map Displayed

Dynamic Geoblog Maps are created on the fly based on a specific pages content. A popup map (within the page) is created for each geo-located post along with a dynamic GeoBlog summary map for the pages content. Update: we've added some new functionality which will enhance your blog's performance even further.

BlurbBits Mapr


The BlurbBits Mapr has two purposes; to create & position multiple standalone BlurbBits and extract & position existing data via RSS feeds or the scratchpad. Existing online content can be extracted using Url parameters and the interactive examples can be easily added to a location to map it (using the extras dialog box). Scratchpad data can be published to the web via Google Spreadsheets and extracted into BlurbBits (a quick summary) and the BlurbsViewr (interactive navigation map).

BlurbsViewr


The BlurbsViewr uses the Url parameters (photos and extracted) to display objects on an interactive map. The map stays persistant while pages are opened below, making it a perfect tool to navigate your geo-referenced data. Use the Scratchpad/Google Spreadsheet to define your own data or combine multiple sources.

GeoBlogging Process

All of the above functionality can be used as a complete geoblogging process that supports remote posting, post centered photos/maps, and interactive Blog map, Dynamics maps and mapping of historical data combined with other websites (for a Travel blog, geotagged photo blog, any geospacial data-- geoblog). With Blogger you have a lot of mapping options that are great for combining with existing sites. Best of all it's free.. try it today!!

Start by playing with the interactive examples to see what standalone BlurbBits you can add (they are the fastest way to improve your site and see what data you already have). Get a basic understanding of the Mapr and the geoblogging process before you go too crazy.

What data do you have?

Photos in Flickr or Picasa work best with albums/sets and can be filtered further using tags to match content or location. Captions will automatically be added if available and remember you don't have to add/edit EVERY photo, they can become just like gadget overload if you are not careful. The mapr is the easiest way to combine photos with a map (to define a post location). If you use Picasa Web Albums, map them in Picasa first and use the Mapr to build a BlurbBit map Album.

If you just want to build an interactive map of your website/blog use the Mapr ScratchPad, at some point you'll need to define each location. If you have existing data you can reuse it by supplying the correct extraction parameters to the Mapr. The scratchpad is just that, so make sure you save the data so you can reuse it later. Try mapping a couple of locations and working through the process before you do them all.

Create a Travel Log

You can easily map your travels by building an electronic travel log in a Notepad text file (like this). Use the BlurbBits Mapr to Load the Scratchpad data (cut & paste your text), If you don't know your location, leave it blank, you can find it using the Mapr Find a Location features. Adjust the positions and set your zoom levels to highlight the correct area (zoom=8 middle of the ocean zoom=12 or 15 for anchorages with good maps). You'll need to upload the file into a Google Spreadsheet in order to map it in the BlurbsViewr.

Later, if you want, you can add photos and links to other pages, like your online photos, your website, wikipedia, or combine it with your Blogs (like this). Creating a BlurbBits enabled blog is the most automatic way of tracking your travels but using the travel log is a great start and it sure beats entering position after position into dialog boxes.

Using Online Photos

Using Online Photos

The whole basis behind BlurbBits is to use existing online data when at all possible, so the last thing we are going to do is ask you to upload photos. We use web based photo services to extract data that is available; the photo, a thumbnail, date and time, location, caption, labels/tags, notes and albums or sets you might have created. The more data you have, the more filtering options you'll have available for BlurbBits creation. Currently we support Picasa and Flickr photos as well as extraction of a "Photo Blog Album" based on the first image in your existing site feed (if available).

Note: if want to use photos and define a location for a blog post, make sure you define the post location. The easiest way is to use the Mapr to find/define the location/zoom of the post and use the Url parameters below to paste into the Mapr's extras textbox. The mapr can also be used to extract existing geotagged photo locations.

If you use use another Online Photo Sharing site, please let us know and we'll add it to our list. If you don't use an online service consider either Picasa or Flickr. Each has their advantages and we use both.
  • Picasa has an off-line version that allows editing and tagging, which is great to use for organizing your photos when there is no internet.. i.e. sitting in a remote anchorage. Their online Picasa Web albums allows us to import all the data into BlurbBits.
  • Flickr has a large online community with comments, groups, and favorites but no off-line organizing/editing.
    We'll compare the two in more depth later.
Adding Photos from Picasa or Flickr

Once you enter design mode you should load the photo strip and choose a photo to "highlight" your BlurbBit. This photo will be added to the Embedded Object as a visual reference prior to loading the rest of the photos and provides the users viewing your feed with a photo and link to the BlurbBit.

Note: you'll be able to adjust the zoom properties of the individual geo-tagged photo maps with the Photo Zoom option (see below). I usually run with a &pz=4 but if you try our first photos, the Marquesas Islands only supports &pz=2, &pz=4 causes a empty background for the map.

Photos from Picasa

Picasa supports a mixture of geo-tagged photos and untagged photos in the same data feed. This is very helpful if you are going back to update some photos (but not all). In BlurbBits the geotagged photo will appear with a map button, the other won't.

Picasa User Photos: &picasa=UserName:Album:Options
  • UserName is your Picasa login name
    Login and check the path http://picasweb.google.com/UserName
    ex: use SailBillabong or sailbillabong for http://picasweb.google.com/SailBillabong
  • Album (optional)
    Select an album and check the path http://picasaweb.google.com/UserName/Album
    ex: use Sailing2005 for http://picasaweb.google.com/SailBillabong/Sailing2005
    Usually just the spaces are removed but double check for special characters just to be sure
  • Options (quess what? they are optional)
    If options are used without an album a blank space Must be used ex: username::tag

    • Tags: use tag=tag1,tag2 to filter photos by tags
      tags can be shortcut by leaving off the tag= ex: user::tag1 is the same as user::tag=tag1
      ex: sailbillabong:sailing2007:orangutan or sailbillabong::chris
    • Query: use q=query1,query2 to search the title, caption and tags
      ex: sailbillabong::q=chris,kt
    • advanced feed parameters such as max-results and start-index can be used
      Default: the first 100 matching photos will be shown
      Picasa does not support feed ordering and the photos are chronological order (first is first). You can use the start-index parameter to "target" the last 100 photos you want to show off.
      If added to other parameters the & must be escaped to %26 or it will be processed as a BlurbBit argument (and skipped by Picasa)
      ex: sailbillabong::q=chris%26max-results=3
      broken ex: sailbillabong::q=chris&max-results=3 (will return all photos)
Interactive Examples:
&picasa=SailBillabong
The first 100 photos from SailBillabong (try your Username)
&picasa=SailBillabong:Sailing2007
The Sailing2007 album from SailBillabong (try Sailing2004,Sailing2005,Sailing2006)
&picasa=SailBillabong:sailing2007:orangutan
Photos matching the tag orangutan in the sailing2007 album
&picasa=sailbillabong::chris
Photos matching the tag chris in all albums
&picasa=sailbillabong::q=chris%26max-results=3
Get only 3 photos matching chris in all albums
&picasa=sailbillabong::start-index=101
The next set of photos

Picasa User Albums: &picalbums=Username

Albums are a great way to show off your photos. The user can browse your albums, their descriptions and maps (if geotagged). When open link is clicked, the selected album opens another BlurbBit containing its photos. It's very fast and easy way to allow access to all your public photos. If you map your album in Picasa first, you can use the BlurbBits Mapr to create a map and photo BlurbBit (example) which can be added to a Blog post to define its location and add the photos for the post (more details).
  • UserName is your Picasa login name
    Same as User Photos (see above)
Interactive Example:
&picalbums=SailBillabong
The albums from SailBillabong (try your Username)

Picasa Public Photos: &picall=Options:Number
  • Options
    Same as for user photo (see above)
    max-results is used by :Number so it's redundant
  • Number: Number of Photos (optional default is 25)
Interactive Examples:
&picall=q=sailing
25 uploaded photos matching sailing
&picall=sailing,turkey:50
50 photos matching sailing and turkey
&picall=sailing,turkey%26start-index=50:50
the next 50 photos

Try your own queries and see what you photos you find!!
There are some strange tag to photo matches!!


Picasa Featured Photos: &picfeat=Options:Number (default 25)
  • Options
    • all: use picfeat=all to get the first 25 photos
    • start-index: use picfeat=start-index=25 to get the next 25
      This is currently broken and has been reported to Google.
  • Number: Number of Photos (optional default is 25)
Interactive Examples:
&picfeat=all
25 featured photos
&picfeat=all:50
50 featured photos
&picfeat=start-index=50:50
the next 50 featured

There are some very cool photos here. Click on the Open Link button to popup the photo in Picasa to check out more our the users photos and albums.

Available Picasa Photo Sizes:

When you upload photos, Picasa creates a large selection of photo sizes. Matching your BlurbBit size to the available photo sizes will optimize the performance. We will automatically scale down the photos to fit into the window, scaling up can cause photo distortion and is not worth the performance gain. The available sizes are:
  • 72, 144, 160,200, 288, 320, 400, 512, 576, 640, 720,800
    measured in pixels along the the longest edge.
Photos from Flickr

Flickr requires an upfront choice with respect to geotagged photos. If you specify geotagged photos you'll ONLY get those photos. Geotagged data does not appear in the normal feed, so it is impossible to combine a mixture of geo and non-geo tagged photos into the same BlurbBit and show a map for only those that are geotagged.

Update: you can also use idgetter to extract your User and Group ids.

Flickr User Photos: &flickr=UserId:Options or &flickrgeo=UserId:Options
  • Use &Flickr for all photos and &flickrgeo for only geotagged
  • UserId is your Flickr Id
    Login, Select your photostream and find the Subscribe to xxx photostream (near the bottom) and click Latest.
    You'll get a page URL like ..public.gne?id=25998359@N07&lang=...
    The numbers and characters between the "=" and the "&" sign are your ID
    ex: use 25998359@N07 for ..public.gne?id=25998359@N07&lang=...
  • Options:
    • Tags: use tag=tag1,tag2 to filter photos by tags
      flickr tags cannot be shortcut

      ex: tags=market,tomatoes for market and tomatoes
    • Sets : use set=setid to show a set
      Use Flickr to navigate to Your Sets and select the desired set
      You'll get a page URL like ....sailbillabong/sets/72157606804117190...
      The numbers after set/ are your setid
      ex: use set=72157606804117190 for ..sailbillabong/sets/72157606804117190
Interactive Examples:
&flickrgeo=25998359@N07
Our latest photos (switch to &flickr= and try your id)
&flickrgeo=25998359@N07:tags=market
latest geotagged with market
&flickrgeo=25998359@N07:tags=market,tomatoes
latest geotagged with market & tomatoes
&flickrgeo=25998359@N07:set=72157606804117190
A set from the market

flickrgeo= could be replaced with flickr= (but we might as well show off our geotags)

Flickr User Favorites: &flickrfavs=UserId
  • UserId is your Flickr Id
    Same as for user photo (see above)
Interactive Examples:
&flickrfavs=25998359@N07
Our favorites, we haven't done much here yet just for testing

User Favorites does not support geotagged photos or tags.. but we're asking Flickr for it!!

Flickr User Friends: &flickrfriends=UserId:Options
  • UserId is your Flickr Id
    Same as for user photo (see above)
  • Options:
    • all: use all to show all photos of your friends
      The default is to show only one photo from each friend
    • or nothing (leave it blank for the default)
Interactive Examples:
&flickrfriends=25998359@N07
Our friends first photo (want to be our friend?)
&flickrfriends=25998359@N07:all
All our friends photos

User friends does not support geotagged photos or tags.. but we're asking Flickr for it!!

Flickr Groups: &flickrgrp=GroupId or &flickrggeo=GroupId
  • Use &flickrgrp for all group photos and &flickrggeo for only geotagged group photos
  • GroupId is the Flickr Group Id
    Find a group, navigate to its Group Pool page and find the Subscribe to xxx group pool (near the bottom) and click Latest.
    You'll get a page URL like ..._pool.gne?id=33122952@N00&lang=...
    The numbers and characters between the "=" and the "&" sign are the GroupId
    ex: use 33122952@N00 for ..._pool.gne?id=33122952@N00&lang=..
Interactive Examples:
&flickrggeo=33122952@N00
Outstanding Travel photos
&flickrggeo=41425956@N00
Travel Photography
&flickrggeo=11488522@N00
Visit the World

flickrggeo= could be replaced with flickrgrp= (but geotags answer where's that?)

There are some great groups that share some amazing photos, and BlurbBits is an easy way to view the GeoTagged photos. I guarantee you'll be asking "where is that?" more than once. You can easily get sucked in, there are almost 30,000 GROUPS with travel photos.

Start here and contact us with any good ones you find.

Click on the Open Link button to popup the photo in Flickr to check out more of the users photos and sets or use the info button to get more info on the photo and photographer.

Available Flickr Photo Sizes:

When you upload photos Flickr creates a select set of photo sizes. Matching your BlurbBit size to the available photo sizes will optimize the performance. We will automatically scale down the photos to fit into the window, scaling up can cause photo distortion and is not worth the performance gain. The available sizes are:
  • 75,100,240,500,1024
    measured in pixels along the the longest edge.
    Note that the Medium size BlurbBit will actually use the 500 size photo

Advanced Photo Properties

The Photo Zoom and PhotoStrip properties can be used to refine the views and performance of the photo within the BlurbBit view.

Photo Zoom: &pz=Value
  • Value: the difference from the main map zoom levels. Default 0
    The Photo Zoom can be used to adjust the zoom levels of the individual photo map (if geotagged) to show close up detail of the area if available or desired. By default the zooms are set to the same as the base map. Be sure to check the availability of high zoom levels, in remote location the higher zoom levels are not support by the underlying Google Static Maps.
Interactive Examples:
&llz=36.2938,30.1497&mi=in&flickrgeo=25998359@N07:set=72157606804117190
Individual photo map are the same zoom levels as the main map
&llz=36.2938,30.1497&pz=6&mi=in&flickrgeo=25998359@N07:set=72157606804117190
Same photos with PhotoZoom set to 6

&llz=36.2938,30.1497,12&pz=2&mi=in&flickrgeo=25998359@N07:set=72157606804117190
Main map zoomed in by 4 (via llz) + a small PhotoZoom (2)

Don't forget to check out the Overview photo map once the photos are loaded. It will be zoomed to fit all the photo locations on the map.


PhotoStrip Options

ThumbNail Size &ts=size
  • Size is the thumbnail size in pixels. Default is 50
    Used to adjust the thumbnail size of the photo in the PhotoStrip
Interactive Examples:
&picalbums=SailBillabong
The albums with the default ThumbNail size
&picalbums=SailBillabong&ts=75
The same with larger thumbnails

Border Padding &pbw=Width and &pbh=Height
  • Width is the border (in pixels) applied to the width of the photo on both the left and right sides. The default is 10.
    This width should be used to adjust the photo sizes into a very wide BlurbBit. If you have a 600x250 BlurbBit, by default we will load the photo size to fit the 600 pixel width (they may be wide panoramics). Pad the width to match or you'll be downloading huge photos to fit. By default the Photo height will be 190 (i.e. 250 -30 -30) so a &pbw=200 will give approximately the same size, however you may wish to adjust the padding based of the aspect ratio of the photo for the best fit.
  • Height is the border (in pixels) applied to the height of the photo on both the top and bottom. The default is 30.
    Don't forget to take into account any ThumbNail size changes.
Interactive Examples:
&picalbums=SailBillabong
The default spacing
&picalbums=SailBillabong&pbw=50&pbh=50
Increased border
&picalbums=SailBillabong&width=600&height=250&pbw=200
A wide album optimized

Just a Photo Map : &pm=1

In this case only a map of photo locations will be extracted, good for embedding in Blog sidebars. Adjust the Width and height to match your application. You'll automatically get a map with the standard BlurbBits above after selecting the photo view type, but sometimes it is hard to display all the photos in a sidebar. This one automatically loads and updates without interaction.

We also sort the photos (by date, latest first) to make sure they appear in the correct order. Use the Picasa start-index parameter to begin with the correct photo.

Interactive Examples:
&picasa=SailBillabong&pm=1&width=220&height=200&mark=smallred&smark=smallred
A map of the first 100 photos from SailBillabong (try your Username)
&picasa=SailBillabong::start-index=100&pm=1&width=220&height=200&mark=smallred&smark=smallred
Skip the first 100 photos from SailBillabong Picasa, start mapping at 100.
&picasa=SailBillabong:Sailing2007&pm=1&mark=midredx&smark=smallred&width=220&height=200
The Sailing2007 map from SailBillabong (try Sailing2004, Sailing2005, Sailing2006). The X mark represents the end of the year location
&picasa=SailBillabong:BillabongAtSea:authkey=VtVRMtCavYI&pm=1&width=220&height=200&mark=smallorange
The BloggerAtSea Blog Album map. Unpublished Albums require AuthKey shown in Album Url
Customize a BlurbBits Map

Customize a BlurbBits Map

The BlurbBits Mapr utility is designed to create multiple location based BlurbBits using an interactive map. Use the Mapr Help or click on the ? button in the tool.

These option are only used to configure the Static maps used in the stand alone BlurbBits. The resulting data can be extracted to create the interactive map through the Viewr.

Don't add too many markers until you understand how zoom is used.

Map marker options: &mark=Marker and &smark=SmallMarker (BlurbBits only)
  • Marker: The marker name used to highlight the Main Location on the Main Map
  • SmallMarker: The marker name used for other locations and the Zoomed out view of the Main Location.
  • From Google Static Maps marker specification
    marker names are formated like {size}{color}{alphanumeric-character}
    -{size} (optional) is the size of marker from the set {tiny, mid, small}. If no size parameter is set, the marker will appear in its default (normal) size.
    -{color} (optional) specifies a color from the set {black, brown, green, purple, yellow, blue, gray, orange, red, white}. Remember to choose a color that will stand out on the BlurbBit Map Type you are designing.
    -{alphanumeric-character} (optional) specifies a single lowercase alphanumeric character from the set {a-z, 0-9}. Note that default and mid sized markers are the only markers capable of displaying an alphanumeric-character parameter. tiny and small markers are too small to show characters and therefore cannot be used.
  • Defaults Main Map &mark=midorangeb &smark=smallorange (for Blogger)
    Others &mark=midredx &smark=smallred
  • Be sure to pick a mark that stands out on you map. We use x as in "x marks the spot".
Interactive Examples:
&llz=36.2938,30.1497
Default Markers
&llz=36.2938,30.1497,14&mark=midredx&smark=smallred
redx and red mark markers

No Map marker: &nom=true
  • Using &nom=true with a &llz statement defines the center location of the map and its zoom level but doesn't add a markerighlight the Main Location on the Main Map.
    Useful when describing an area but not a specific location.
Interactive Examples:
&llz=36.2938,30.1497,14&nom=true
Same map but hold the marker

BlurbBit Map Zooms: &zooms=in,out or &zoom=in and &ozoom=out

In the BlurbsViewer &zoom is used to defined the default zoom values for ALL objects.
  • in: The default zoomed in level (a higher #) default is 8
  • out: The default zoomed out level (a lower #) default is 2
    See Location specification for example levels and notes
  • A llz position with a specified zoom level will always use it's level for the zoomed in view and subtract 6 for its default zoomed out view. Only the zoomed out view will be overridden.
  • Within the BlurbBits Mapper
    A zoom level is always added to all markers, so only the zoomed out level is effected
Interactive Examples:
&llz=36.2938,30.1497&zooms=14,6
Forced to zoom levels 14 and 6
&llz=36.2938,30.1497,8&zooms=14,6
Uses zoom levels 8 (from llz) and 6 (from zooms). The default would be 8 and 2 (8-6)

Specify a location: &llz=lat,lng,z

Defines a specific Location and an optional Zoom level to create a map. It is also used to extract the entry location from an existing BlurbBit (from Blogger or feed). In the BlurbBits Mapr these are created via the add marker functionality. In the Viewr these are used to create the initial viewport.
  • lat: Latitude in decimal degrees (use negative values for South)
    ex: enter 32.5 for 30 degrees 30 minutes N
    ex: enter -32.5 for 30 degrees 30 minutes S
  • lng: Longitude in decimal degrees (use negative values for West)
    ex: enter 178.5 for 178 degrees 30 minutes E
    ex: enter -178.5 for 178.5 degrees 30 minutes W
    5 decimal of precision gives a good level of accuracy but is usually only necessary on the interactive map or high zoom levels. More than 5 decimal places are rounded.
  • z: Optional zoom level (default is 8)
    Map default can be overridden using the zoom parameters above
    • 0 - The World
    • 1 - Unknown location
    • 5- Country
    • 6 - Region
    • 8 - Sub-region
    • 11 - Town
    • 13 - Post code
    • 15 - Street
    • 16 - Intersection
    • 17 - Address

    The BlurbBits Mapr can translate comma separated values of the Blogger Text format DD MM.MM[N|S],DDD MM.MM[E|W] by entering them in the LLZ or Center Lat,Lng,Z text fields and hitting enter.
    Ex: Entering 32 30.0S,178 30.0W would move the map to -32.5,-178.5,8
Interactive Examples:
&llz=36.2938,30.1497
Position Map and use default zoom level
&llz=36.2938,30.1497,12
Position Map and use zoom level 12

Specify a route or path: &path=PathDefinition (BlurbBits only)
  • PathDefinition: See Google Static Maps path specification (change | to +)
    Multiple paths can be specified (use another &path=)
    No more than 50 points can be a used in all paths and markers.
    Zoom is NOT allowed in the path points statement
  • When using the BlurbBits Mapr the path statement will replace (| to +) to facilitate ScratchPad storage in | mode. Both forms are valid in BlurbBits (Positive values MUST not be proceeded by a + sign).
  • This statement can be combined with an llz point to specify a location. The map will have two zoom levels in this mode. The path bounds will be considered the "out" view for the map. To get an overview location of the route (for detailed routes), set a lower zoom on an llz definition, add nom=true, and use &mi=out (the marker).
  • If you have existing KML/KMZ data, use the K: ScratchPad option to load the file and roughly trace your route (remember on 50 total points are allowed). If you have GPS data there are many utilities that convert GPS tracks to KML files.

    It's much easier to draw the line with the BlurbBits Mapr
Interactive Examples:
&path=rgba:0xff0000ff,weight:2+25.1,-113.2+-2.1,-121.6+-14.6,-151+-16,173
Same points but drawn as a line across the south pacific
&llz=25.1,-113.2&path=rgba:0xff0000ff,weight:2+25.1,-113.2+-2.1,-121.6+-14.6,-151+-16,173
Adds a location definition to BlurbBit

Initial Map Zoom: &mi=in
  • mi: Use in to start with map zoomed in (default is out)
  • The BlurbBits Mapr automatically adds the &mi=in option by default it can be overridden by adding &mi=out to the extras.
  • If a path and a point are used in the same BlurbBit, the bounds of the path are used for the out zoom level.
Interactive Examples:
&llz=36.2938,30.1497,14
Default Map
&llz=36.2938,30.1497,14&mi=in
Zoomed in Map

BlurbBit Map Type: &mt=MapType
  • MapType: Change the style of the Map used
    • mt=h for hybrid satellite with labels (the Default)
    • mt=s for satellite
    • mt=t for terrain
    • mt=r for roadmap
    • Not all maps support detailed maps (so check your results)
  • Within the Mapr
    Changing the map with the Pulldown menu also sets the maptype .
Interactive Examples:
&llz=36.2938,30.1497,14
Default Map
&llz=36.2938,30.1497,14&mt=t
A Terrain version

Specify multiple locations: &llza=llz1+llz2+llz3 (BlurbBits only)

This is how data gets passed between our various utilities. These points are only used to display a BlurbBit and are not extracted as a Location in Blogger or other sources. Multiple individual locations should be used instead. However I'm sure someone will come up with a good use for it.
  • Points: a + separated list of llz (same as single location)
    Markers use the smark value
    Map will be scaled to show all markers
    Does not support additional single llz or path statements
    A Quick Way: Create a line in the BlurbBits Mapr, save it to the scratch pad and use LINEPTS parameter.
Interactive Examples:
&llza=25.1,-113.2,8+-2.1,-121.6+-14.6,-151+-16,173
Shows some points across the south pacific