The whole basis behind BlurbBits is to use existing online data when at all possible, so the last thing we are going to do is ask you to upload photos. We use web based photo services to extract data that is available; the photo, a thumbnail, date and time, location, caption, labels/tags, notes and albums or sets you might have created. The more data you have, the more filtering options you'll have available for BlurbBits creation. Currently we support Picasa and Flickr photos as well as extraction of a "Photo Blog Album" based on the first image in your existing site feed (
if available).
Note: if want to use photos
and define a location for a blog post, make sure you define the post location. The easiest way is to use the
Mapr to find/define the location/zoom of the post and use the
Url parameters below to paste into the Mapr's extras textbox. The mapr can also be used to extract existing geotagged photo locations.
If you use use another Online Photo Sharing site, please
let us know and we'll add it to our list. If you don't use an online service consider either Picasa or Flickr. Each has their advantages and we use both.
- Picasa has an off-line version that allows editing and tagging, which is great to use for organizing your photos when there is no internet.. i.e. sitting in a remote anchorage. Their online Picasa Web albums allows us to import all the data into BlurbBits.
- Flickr has a large online community with comments, groups, and favorites but no off-line organizing/editing.
We'll compare the two in more depth later.
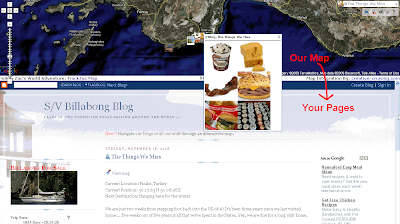
Adding Photos from Picasa or FlickrOnce you enter design mode you should load the photo strip and choose a photo to "highlight" your BlurbBit. This photo will be added to the Embedded Object as a visual reference prior to loading the rest of the photos and provides the users viewing your feed with a photo and link to the BlurbBit.
Note: you'll be able to adjust the zoom properties of the individual geo-tagged photo maps with the Photo Zoom option (see below). I usually run with a &pz=4 but if you try our first photos, the Marquesas Islands only supports &pz=2, &pz=4 causes a empty background for the map.
Photos from PicasaPicasa supports a mixture of geo-tagged photos and untagged photos in the same data feed. This is very helpful if you are going back to update some photos (but not all). In BlurbBits the geotagged photo will appear with a map button, the other won't.
Picasa User Photos: &picasa=UserName:Album:Options
- UserName is your Picasa login name
Login and check the path http://picasweb.google.com/UserName
ex: use SailBillabong or sailbillabong for http://picasweb.google.com/SailBillabong - Album (optional)
Select an album and check the path http://picasaweb.google.com/UserName/Album
ex: use Sailing2005 for http://picasaweb.google.com/SailBillabong/Sailing2005
Usually just the spaces are removed but double check for special characters just to be sure
- Options (quess what? they are optional)
If options are used without an album a blank space Must be used ex: username::tag
- Tags: use tag=tag1,tag2 to filter photos by tags
tags can be shortcut by leaving off the tag= ex: user::tag1 is the same as user::tag=tag1
ex: sailbillabong:sailing2007:orangutan or sailbillabong::chris
- Query: use q=query1,query2 to search the title, caption and tags
ex: sailbillabong::q=chris,kt - advanced feed parameters such as max-results and start-index can be used
Default: the first 100 matching photos will be shown
Picasa does not support feed ordering and the photos are chronological order (first is first). You can use the start-index parameter to "target" the last 100 photos you want to show off.
If added to other parameters the & must be escaped to %26 or it will be processed as a BlurbBit argument (and skipped by Picasa)
ex: sailbillabong::q=chris%26max-results=3
broken ex: sailbillabong::q=chris&max-results=3 (will return all photos)
Interactive Examples:&picasa=SailBillabong
The first 100 photos from SailBillabong (try your Username)&picasa=SailBillabong:Sailing2007
The Sailing2007 album from SailBillabong (try Sailing2004,Sailing2005,Sailing2006)&picasa=SailBillabong:sailing2007:orangutan
Photos matching the tag orangutan in the sailing2007 album&picasa=sailbillabong::chris
Photos matching the tag chris in all albums&picasa=sailbillabong::q=chris%26max-results=3
Get only 3 photos matching chris in all albums&picasa=sailbillabong::start-index=101
The next set of photos&picalbums=Username
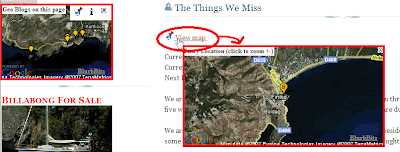
Albums are a great way to show off your photos. The user can browse your albums, their descriptions and maps (if geotagged). When
open link is clicked, the selected album opens
another BlurbBit containing its photos. It's very fast and easy way to allow access to all your public photos. If you
map your album in Picasa first, you can use the
BlurbBits Mapr to create a map and photo BlurbBit (
example) which can be added to a Blog post to define its location
and add the photos for the post
(more details).
- UserName is your Picasa login name
Same as User Photos (see above)
Interactive Example:&picalbums=SailBillabong
The albums from SailBillabong (try your Username) &picall=Options:Number
- Options
Same as for user photo (see above)
max-results is used by :Number so it's redundant
- Number: Number of Photos (optional default is 25)
Interactive Examples:&picall=q=sailing
25 uploaded photos matching sailing&picall=sailing,turkey:50
50 photos matching sailing and turkey&picall=sailing,turkey%26start-index=50:50
the next 50 photos
There are some strange tag to photo matches!!Picasa Featured Photos: &picfeat=Options:Number (default 25)
- Options
- all: use picfeat=all to get the first 25 photos
- start-index: use picfeat=start-index=25 to get the next 25
This is currently broken and has been reported to Google.
- Number: Number of Photos (optional default is 25)
Interactive Examples:&picfeat=all
25 featured photos&picfeat=all:50
50 featured photos&picfeat=start-index=50:50
the next 50 featuredOpen Link button to popup the photo in Picasa to check out more our the users photos and albums.
Available Picasa Photo Sizes:When you upload photos, Picasa creates a large selection of photo sizes. Matching your BlurbBit size to the available photo sizes will optimize the performance. We will automatically scale
down the photos to fit into the window, scaling up can cause photo distortion and is not worth the performance gain. The available sizes are:
- 72, 144, 160,200, 288, 320, 400, 512, 576, 640, 720,800
measured in pixels along the the longest edge.
Photos from Flickr
Flickr requires an upfront choice with respect to geotagged photos. If you specify geotagged photos you'll ONLY get those photos. Geotagged data does not appear in the normal feed, so it is impossible to combine a mixture of geo and non-geo tagged photos into the same BlurbBit and show a map for only those that are geotagged.
Update: you can also use
idgetter to extract your User and Group ids.
Flickr User Photos: &flickr=UserId:Options
or &flickrgeo=UserId:Options
- Use &Flickr for all photos and &flickrgeo for only geotagged
- UserId is your Flickr Id
Login, Select your photostream and find the Subscribe to xxx photostream (near the bottom) and click Latest.
You'll get a page URL like ..public.gne?id=25998359@N07&lang=...
The numbers and characters between the "=" and the "&" sign are your ID
ex: use 25998359@N07 for ..public.gne?id=25998359@N07&lang=... - Options:
- Tags: use tag=tag1,tag2 to filter photos by tags
flickr tags cannot be shortcut
ex: tags=market,tomatoes for market and tomatoes
- Sets : use set=setid to show a set
Use Flickr to navigate to Your Sets and select the desired set
You'll get a page URL like ....sailbillabong/sets/72157606804117190...
The numbers after set/ are your setid
ex: use set=72157606804117190 for ..sailbillabong/sets/72157606804117190
Interactive Examples:&flickrgeo=25998359@N07
Our latest photos (switch to &flickr= and try your id)&flickrgeo=25998359@N07:tags=market
latest geotagged with market&flickrgeo=25998359@N07:tags=market,tomatoes
latest geotagged with market & tomatoes&flickrgeo=25998359@N07:set=72157606804117190
A set from the market
Flickr User Favorites: &flickrfavs=UserId
- UserId is your Flickr Id
Same as for user photo (see above)
Interactive Examples:&flickrfavs=25998359@N07
Our favorites, we haven't done much here yet just for testing&flickrfriends=UserId:Options
- UserId is your Flickr Id
Same as for user photo (see above) - Options:
- all: use all to show all photos of your friends
The default is to show only one photo from each friend - or nothing (leave it blank for the default)
Interactive Examples:&flickrfriends=25998359@N07
Our friends first photo (want to be our friend?)&flickrfriends=25998359@N07:all
All our friends photos&flickrgrp=GroupId or &flickrggeo=GroupId
- Use &flickrgrp for all group photos and &flickrggeo for only geotagged group photos
- GroupId is the Flickr Group Id
Find a group, navigate to its Group Pool page and find the Subscribe to xxx group pool (near the bottom) and click Latest.
You'll get a page URL like ..._pool.gne?id=33122952@N00&lang=...
The numbers and characters between the "=" and the "&" sign are the GroupId
ex: use 33122952@N00 for ..._pool.gne?id=33122952@N00&lang=..
Interactive Examples:&flickrggeo=33122952@N00
Outstanding Travel photos&flickrggeo=41425956@N00
Travel Photography&flickrggeo=11488522@N00
Visit the World
Start here and contact us with any good ones you find.Click on the Open Link button to popup the photo in Flickr to check out more of the users photos and sets or use the info button to get more info on the photo and photographer.
Available Flickr Photo Sizes:When you upload photos Flickr creates a select set of photo sizes. Matching your BlurbBit size to the available photo sizes will optimize the performance. We will automatically scale
down the photos to fit into the window, scaling up can cause photo distortion and is not worth the performance gain. The available sizes are:
- 75,100,240,500,1024
measured in pixels along the the longest edge.
Note that the Medium size BlurbBit will actually use the 500 size photo
Advanced Photo Properties
The
Photo Zoom and
PhotoStrip properties can be used to refine the views and performance of the photo within the BlurbBit view.
Photo Zoom: &pz=Value
- Value: the difference from the main map zoom levels. Default 0
The Photo Zoom can be used to adjust the zoom levels of the individual photo map (if geotagged) to show close up detail of the area if available or desired. By default the zooms are set to the same as the base map. Be sure to check the availability of high zoom levels, in remote location the higher zoom levels are not support by the underlying Google Static Maps.
Interactive Examples:&llz=36.2938,30.1497&mi=in&flickrgeo=25998359@N07:set=72157606804117190
Individual photo map are the same zoom levels as the main map&llz=36.2938,30.1497&pz=6&mi=in&flickrgeo=25998359@N07:set=72157606804117190
Same photos with PhotoZoom set to 6
&llz=36.2938,30.1497,12&pz=2&mi=in&flickrgeo=25998359@N07:set=72157606804117190
Main map zoomed in by 4 (via llz) + a small PhotoZoom (2)
Don't forget to check out the Overview photo map once the photos are loaded. It will be zoomed to fit all the photo locations on the map.
ThumbNail Size &ts=size
- Size is the thumbnail size in pixels. Default is 50
Used to adjust the thumbnail size of the photo in the PhotoStrip
Interactive Examples:&picalbums=SailBillabong
The albums with the default ThumbNail size&picalbums=SailBillabong&ts=75
The same with larger thumbnails &pbw=Width and &pbh=Height
- Width is the border (in pixels) applied to the width of the photo on both the left and right sides. The default is 10.
This width should be used to adjust the photo sizes into a very wide BlurbBit. If you have a 600x250 BlurbBit, by default we will load the photo size to fit the 600 pixel width (they may be wide panoramics). Pad the width to match or you'll be downloading huge photos to fit. By default the Photo height will be 190 (i.e. 250 -30 -30) so a &pbw=200 will give approximately the same size, however you may wish to adjust the padding based of the aspect ratio of the photo for the best fit.
- Height is the border (in pixels) applied to the height of the photo on both the top and bottom. The default is 30.
Don't forget to take into account any ThumbNail size changes.
Interactive Examples:&picalbums=SailBillabong
The default spacing&picalbums=SailBillabong&pbw=50&pbh=50
Increased border&picalbums=SailBillabong&width=600&height=250&pbw=200
A wide album optimized
&pm=1
In this case only a map of photo locations will be extracted, good for embedding in Blog sidebars. Adjust the Width and height to match your application. You'll automatically get a map with the standard BlurbBits above
after selecting the photo view type, but sometimes it is hard to display all the photos in a sidebar. This one automatically loads and updates without interaction.
We also sort the photos (by date, latest first) to make sure they appear in the correct order. Use the Picasa start-index parameter to begin with the correct photo.
Interactive Examples:&picasa=SailBillabong&pm=1&width=220&height=200&mark=smallred&smark=smallred
A map of the first 100 photos from SailBillabong (try your Username)&picasa=SailBillabong::start-index=100&pm=1&width=220&height=200&mark=smallred&smark=smallred
Skip the first 100 photos from SailBillabong Picasa, start mapping at 100.&picasa=SailBillabong:Sailing2007&pm=1&mark=midredx&smark=smallred&width=220&height=200
The Sailing2007 map from SailBillabong (try Sailing2004, Sailing2005, Sailing2006). The X mark represents the end of the year location&picasa=SailBillabong:BillabongAtSea:authkey=VtVRMtCavYI&pm=1&width=220&height=200&mark=smallorange
The BloggerAtSea Blog Album map. Unpublished Albums require AuthKey shown in Album Url


 You can adjust markers, zoom levels, location, travel path, map type and initial view. These parameters are also used to customize extracted maps. Location maps (&llz) also define a blog post's location when added to an individual blog post.
 Manages
  The parameters from the sections above can be combined into a single BlurbBit which shows photos and defines a blog post's location. This can be used to manage
 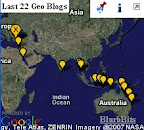 Create summary maps/photos from existing data using
  The interactive examples of the various sections can be used to learn about a specific set of BlurbBit features. Click on the
  icon to see the BlurbBit. Text entered in the textbox will be passed as the BlubBits
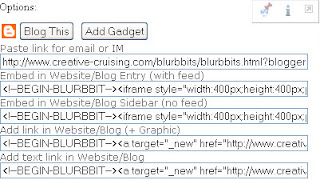


 You may have seen this banner after you've published a Blogger blog. When you click on the link you literally get thousands of gadgets that are available to add to your Blog