Blogger Mapping Options

Blogger Mapping Options

1/17/2010 Update: Blogger's Geotagging method is still only available in draft mode after over a year. It has been broken a couple of times and there is still no Blogger supported method for geotagging posts via email.

Note: This post was originally posted on BlogsMapr (our BlurbBits Blogger playground). We wanted to test/support the new Blogger-in-Draft geotagging editor and answer some questions about why you'd want to geotagged posts (can you believe they asked?). We continue to use BlurbBits in our Sailing Blog (via standard Blogger) because it supports remote blogging, has more configurability AND you can specify a locations zoom level on a post by post basis. We have a documented migration path for when the editor becomes more mainstream (and by then we'll be sure to have a utility).

Now What?

You've defined post locations via Blogger-in-Draft, our position text input (for Mail-to-blogger) or by adding stand alone BlurbBits to your posts (to add routes and photos etc).. So now what?

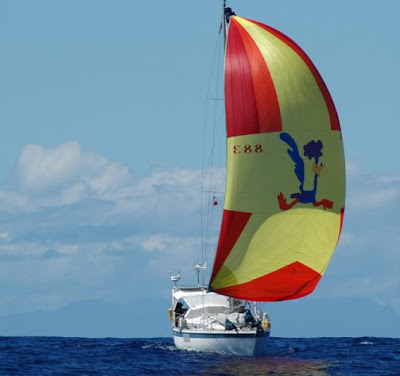
Well we've been GeoBlogging for 3.5 years, using Blogger to track our 5 year 30,000 mile sailing trip, so we've got some ideas and some tools. Here are some cool things you can do with BlurbBits and related utilities.
  • Blogger Popup maps and a Dynamic GeoBlog Summary map
    Each post with a defined location will have a popup map within your Blog. In addition, a GeoBlogs on this Page summary map is dynamically created based on the posts on each page. If posts are filtered by searching, labels or selecting an archive month or year, the map will automatically change to show only the relevant geoblog posts. It's a great way to visualize blogs locations for a year or specific area (via label).


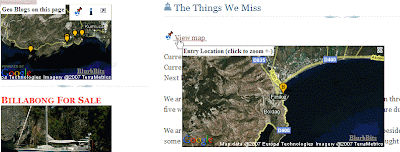
    Open our Sailing Blog (standard Blogger) or BlurbBits Playground (Blogger-in-draft) and notice the View map links. They were automatically added via our gadget.

    Click on the link to display a quick Google Static Map of the location directly within Blogger (no new page to open). An additional click, in the map, will display the zoomed out view. Try selecting a Blog Archive month and watch the Geo-Blogs map change.
  • Navigate your blog via an interactive map


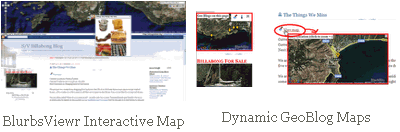
    Not only do you get to see your blog locations on an interactive map, we also extract a summary of each post and the first photo for a preview. We maintain the map and open your blog pages directly in the window below (select from the list on the top right or click the [more] link in the preview). The map stays persistent allowing the user to smoothly navigate your geoblog posts.


    On the Add Page Element page click Edit Content and adjust YOURBLOG to the correct location (ie. YOURBLOG.blogspot.com .. blogsmapr for this Blog). If you use FTP posted blogs change blogger=YOURBLOG to bloggerid=BLOGID (blogID=XXX in the post editor URL). Click here for more BlurbsViewr details and options.
  • Extract a map for selected Blog posts to embed or email. Maps can be customized based on the desired number of posts and/or filtered by categories/labels. Click the i Info button to select various publishing options. The BlurbBits in the sidebar were extracted from other blogs. Learn how to adjust the widget size for sidebar vs post installs.
  • Create a "Where Blog map" to embed or email showing the latest geoblog location with a link to the latest post. Same as above using &mv=where and &mi=in.
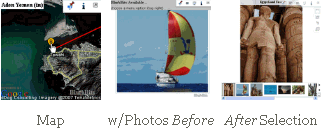
  • Create a GeoBlog photo album. This method extracts the first photo (so make it good) and the post location to create a photo album for the blog. Posts which are geotagged will appear with a Location map button. A short blog summary can be previewed by selecting the notes button. Add &bp=1 to the extract a map example.

    Photos stored online with Picasa or Flickr can be displayed in the same album BlurbBit format, examples are scattered throughout all our blogs.
Check out our BlurbBits basics section for more details. Most of our sailing blogs were created using Mail-to-Blogger and updated once we got to port and an internet connection.

To see all of our online Sailing content including our Webpage journals and photos, Youtube videos, Blogger posts and KML GPS tracks click here. This data was entered in the BlurbsBits Mapr scratchpad which can be uploaded to the web via Google Spreadsheets.
Picasa - Remote Photo Editing

Picasa - Remote Photo Editing

We love traveling to remote places, taking lots of pictures and sharing our experiences through our Blogs. One of our main issues is the lack of internet access because most photo sharing sites force you to make collections and albums online.

Picasa is great because you can add captions and tags, edit and organize your photos into albums all without internet access. You can even Geotag your Picasa photos in Google Earth while it is offline. Then once you find an internet connection you can upload your photos to your Picasa Web Albums and easily turn them into BlurbBit Albums that you can add to your Blog Posts.

Picasa is really two tools, Picasa which lives on your local computer (and manipulates your local photos) and Picasa Web Albums which manages photos you choose to upload and share on the web (BlurbBits uses these). Note: BlurbBit references to Picasa relate to the shared web albums.

Upload via Direct Internet Connection

If we have a direct Internet connection we use Picasa Upload (from your computer).

Choose or Create an Album, Select the Image size. Since we usually only use the photos for our blog, we use the small size to save space and prevent printing of our photos.

Upload at Internet Cafe

If we don't have direct access, we use Picasa Export to save the selected photos to a new folder.


Then we copy the directory to a USB stick. Once you are at the internet Cafe, Log onto Web Albums and use the Upload button. Select or create a new album and add the files from your stick, it's a little slower this way but sometimes it beats lugging your computer to the Cafe.
If you use Flickr or another photo sharing site, use Picasa Export to save the selected photos to a new folder. Upload the photos from the new folder using your sites uploading instructions.

MoBlogging and Photo Maps

Picasa Web Albums supports email upload or you can use Blogger to upload your blog text and photos from a remote location. Check out the details here.

Photo Album and Map

Once an album is uploaded you can map the photo albums. This is much easier than geotagging ALL your individual photos (we support both). We also make it easy to build a BlurbBit (w/Map + Photos) using the BlurbBits Mapr. If you add the resulting BlurbBit to a blog post, we use it to determine the posts location. Once we have the posts location we can map that too, all that from a single mapped Picasa Album!! If you add/modify the photos or change captions/notes to photos in the album, all the changes will appear in the BlurbBit automatically.

Note: the same process can be used remotely with any non-web based photo editing tool that saves Exif data (like Adobe Photoshop Lightroom) . Test a couple of photos (raw vs jpeg) to make sure you have complete data (captions and geotags) before going too crazy. We do need the photos online (Picasa or Flickr) to gain access to them. Picasa has good synchronization between your photos on the PC and the Web Albums.

MoBlogging - Blogger on the Go

MoBlogging - Blogger on the Go


Update: We are also reviewing
posterous for remote email blogging AND photo sharing. Posterous' focus is "dead simple" blogging via email. Blogger's email functionality is very limited and support/updates to the email method are non-existent.

Sometimes you want to blog but you can't access the internet directly (i.e you're in the middle of the ocean 1000 of miles from the nearest Internet Cafe).


Blogger has two methods to support moblogging which can be used to add text, a small photo, or both (hey I didn't make up the term).
Geo MoBlog Photo Maps

Note: this section is mostly applicable to Blogger-Mobile users who take photos with a GPS enabled device and want to map their tracks through photos NOT blog post content.

If your photos are geotagged (either manually or via a geotagging enabled phone) you can easily create a photo based map of your travels. When images are uploaded to Blogger, an album is automatically created in Picasa Web Albums. Go there, find your Blogs Album and click on the link (notice the AuthKey in the URL you'll need that).

In the examples below, use the i (Info) button to view the embedding options. Use the Blogger AddGadget button to add to the sidebar and the BlogThis button to add to as a new post. Adjust the &width and &height to match your blog layout size and usage (sidebar vs post).

Interactive Examples:
&picasa=SailBillabong:IndianOceanPictures&pm=1&width=220&height=200&mark=smallred&smark=smallred
Our Indian Ocean Photos Mapped
&picasa=SailBillabong:IndianOceanPictures:start-index=10&pm=1&width=220&height=200&mark=smallred&smark=smallred
Skip the first 10 photos from our Photos Above.
&picasa=SailBillabong:IndianOceanPictures:start-index=10
Show the Album Photos to find the correct start-index.
&picasa=SailBillabong:Sailing2007&pm=1&mark=midredx&smark=smallred&width=220&height=200
The Sailing2007 map from SailBillabong (try Sailing2004, Sailing2005, Sailing2006). The X mark represents the end of the year location
&picasa=SailBillabong:BillabongAtSea:authkey=VtVRMtCavYI&pm=1&width=220&height=200&mark=smallorange
The BloggerAtSea Blog Album map. Unpublished Albums require AuthKey shown in Album Url

Picasa orders their feeds starting with the first photo taken, so you may need to adjust the start-index to focus on a certain portion of the trip. Leave off the &pm=1 and make sure you are starting with the correct photo. Once you have completed a trip you can copy a set of photos into a new Album which details the trip. Do not move or delete the photos, they will be removed from the Blog post.

I have already seen photo blogs dedicated only to geotagged photos for tracking purposes. The photos are usually horrible quality and the posts don't include text, which in my mind is pretty much a completely useless Blog. If you are only using photos to track your travels it makes more sense to use Picasas email upload.

Picasa Email Upload

Picasa also supports email upload of photos and you can place them into specific albums by using an existing album name as the email subject. If your mobile device supports geotagging you can easily get a map of just that album using the method above, use the album name to differentiate various trips. You can even highlight your favorite photos in a BlurbbBits photo album in a Blog post about your trip.

Interactive Travel Photo Maps

You can even use the same data to build an interactive map by using the same URL parameters with the BlurbsViewr.

Here's the BlurbsViewr map for our Indian Ocean Pictures (?picasa=SailBillabong:IndianOceanPictures).

If your photos are taken sequentially along your travel path you can add &tt=travel&mi=out to the URL to create a Travel Tracking Path with a calculated total distance - (select Trip Summary from the list in the upper right).

Extracting geotagged data

If you have a GPS Enabled phone or an automatic method for geotagging your photos, the location data you need is already hidden inside it. You can easily extract the Lat/Lng data using the BlurbBits Mapr and then use it to geotag your blog posts.

Here's the Indian Ocean Pictures. Click on sidebar list to navigate/zoom to a photo. The Center Lat,Lng,Z: field is the Lat/Lng and zoom of the photo location. Use the first two fields for the Lat/Lng in the Blogger-in-draft location editor to geotag the Blogger post (don't forget to remove the comma).

You can also use mapr to add a BlurbBit map of this location into your blog post. If you are using the non draft version of Blogger, this also allows the blog post to be mapped.
Migrating Lat/Lng to Blogger Geotags

Migrating Lat/Lng to Blogger Geotags

I have been following Blogger's announcement Blogger in Draft: New feature: Geotagging and noticed that some users are having a hard time finding their exact post locations. I have also seen various informal "geotagging" techniques used around various Blogger sites; Google Maps, Google Static maps, KML/KMZ files or text input and all geotagged photos contain the lat/lng data within the Exif data. All of these methods require knowledge of the exact Lat/Long for the marker (ie. post location). Since all of our Sailing Blogs are tagged with Lat/Lng, I thought I'd detail the migration path.

Blogger-in-Draft Location Editor


Enter a space separated Lat Lng pair into the search box of the Blogger-in-Draft location editor and click Search. This will zoom the map to the correct location but leave the Location link name blank. Zoom out (using the - button), the Location link name should now appear.

Adjusting the Location String

The Location string is determined via the reverse geocoder which will sometimes result in Unknown Location. You can adjust the Location name by clicking on the Location Link under the search box (next to Location:) and entering the desired Location text.

When I first tested direct lat/lng entry it didn't appear to work correctly (user error? Bug Fix?). Sometimes the result would shift back to the reverse geocoded result instead of the Lat/Lng in the search string.

Finding a Lat/Lng

There are lots of ways to get the Lat/Lng of a location/address including Wikipedia (good for tourist locations) or by extracting the data from geotagged photos (from a mobile device or automatic geotagging software).
Cool Things To Try

Cool Things To Try

Here's some cool things to try with BlurbBits

This assumes you have a little understanding of how BlurbBits and the BlurbBits Mapr work.

Fun with Photos

One of the main reasons we go though the effort of selecting, organizing (tagging and captioning) and cataloging our photos (into albums or sets) is for our own enjoyment. There is nothing like an album of your favorite photos to stir up some memories to reflect on past adventures.

If you don't have a blogger account sign up for one. It's easy and you'll be Blogging in two minutes.

BLURB-THIS - a BlurbBit & Blog for a Picasa Album:
&picalbums=SailBillabong
Photo albums from SailBillabong (try your Username)
  • UserName is your Picasa login name
    Login and check the path http://picasweb.google.com/UserName
    ex: use SailBillabong for ...com/SailBillabong
  • Learn More
Open the Albums by clicking the Icon and make sure some albums are found for your account. You are also welcome to use ours as an example.

Now run the BlurbBits Mapr with the album URL parameters from above (replace the & with ?). ex: ..setup.html?picalbums=SailBillabong

This will load the Picasa albums in the sidebar and place those with a defined location on the map (ah the glory of data re-use). Click on an album and if it is not already placed, drag it onto the map and click to set the location (and current zoom). If you are using this album to define a Blogs location adjust it as needed. This is where it helps to use the LLZ to pin point the location/zoom and then drag the album to it. Adjust the zoom level if needed; find the zoom level you like and use RMC set Zoom. Adjust the Map or Photo Parameters as necessary (don't forget toggle to update). Try adding these for a start &mark=midredx&smark=tinyred (append to the end of the extras line) . Preview your BlurbBit, open the photostrip and select the photo you feel best summarizes the photos or thoughts. Make any adjustments and re-Preview. Once satisfied, select the i (info) button and click the BlogThis button.

A Blog Your Bit popup will appear. Click the Login button and login into your Blogger account (you only need to do this once). Choose your Blog (if you have more than one) and then write your post; add more details about the trip, add any reflections you may have had or just describe the album. The BlurbBit will replace the [BLURBBIT] tag, so feel free to add text before and/or after. Select Publish Post. The unformatted blog will appear below as a preview, select the link to navigate to the actual blog post (or view Our Sample result .. cheater).

Now that wasn't that bad, you've got a blog post describing your trip or photos, an entire albums worth of photos, complete with captions, geo-photo map, notes and a link to the Picasa photos online. If you have your photos tagged (or in sets via Flickr) you can easily filter them to a specific topic or location that you want to write about. Filter your Photos and write your Blog or write your blog and then find the photos that match your topic.. it's that simple.

Then slice and dice the results into different views...

Interactive Examples:
&blogger=blogsmapr
A Blogger map for blogsmapr.blogspot.com
&blogger=blogsmapr&bp=1
A Blog Album (blogs with photos only)
&blogger=blogsmapr&mv=where&mi=in
A BlurbBits "Where" Blog map with link to latest post and last known location.

And ..
An interactive Blog navagation map with similar viewing options (last location or full view).

When you are finished with the Album don't forget to unset the update toggle or you will overwrite the other albums on subsequent previews. In most cases the update toggle is a good way to set the default preferences for many objects. Picasa albums are the only objects that come pre-configured (so far).

If you want to add a path or route to your album, use the RMC to set the map to add line mode and use left mouse clicks to draw your line (use RMC to stop adding points). Then select the entire path description to the right of the Preview BlurbBit Button and copy it (CTRL-C or RMC copy). Select the album and paste the new path at the end on the Extras line. Don't forget to replace the ? with a & (we'll remind you). Make sure the Select Toggle is enabled and Preview your new addition. Double check your photo maps if you changed the zoom of your album location. If the line doesn't appear make sure the Select toggle in On!! (My Sample Route result).

Now you added a travel map and favorite, last or average position to all the photos, not a bad way to enhance your blog. It doesn't stop there, if you have more than just a blog, you can map ALL your webpages. Here is all of our SailBillabong journals, photo albums (the old way), videos and our blogs (automatically updated).

If you are using a public machine don't forget to logout of your Blogger account.

An interactive Trip Photo Album map

The good thing about maps is they give users a really good sense of your travel destinations. The bad thing is you need to define where you were in order to build them. If you already have geotagged photos they'll automatically appear on the Viewr map. If not ..the thought of geotagging 25,000 photos is mind boggling. The good news is you don't really need to geotag every photo to map them, just the albums or your own web pages that display the photos.

Picasa albums are really easy because you only need to set one location per album and we automatically convert the album into a BlurbBit with all the photos.

Run the BlurbsViewr with your Picasa Album
ex: .../blurbsviewr.html?picalbums=SailBillabong

Your albums will appear with the latest album highlighted. When you open the album (select from the list, click [more] or double click on the icon) the BlurbBit for album photos will open in the window below. Quick and easy way to navigate all you trip photos eh?

There's more.. if your albums represent a single trip (like ours) you can create a rough Travel Track with the date and location of the albums. Add &tt=travel&mi=out to the BlurbsViewr album parameters (or Try Ours).
ex: .../blurbsviewr.html?picalbums=SailBillabong&tt=travel&mi=out
You'll find out VERY quickly how accurate your dates and locations are. Highlighting the Trip Summary will display the approx distance Traveled.

If that's too much work to clean up, you can draw the lines in the BlurbBits mapr and save them to a Google Spreadsheet. See our Example with Drawn Tracks. These paths can also be used when creating a standalone BlurbBit of just the album to embed on your page.

The ultimate trip photos map.. all of our individual geotagged photos and our drawn lines or you can overlay them with our actual GPS tracks (from KML).

Remember if you don't use Picasa albums you can still use the ScratchPad to enter your data for each page and then use a GoogleSpread sheet to extract the data for the Viewr. You can even combine your photos and your blogs on the same map or heck do everything. Don't forget the best part, any changes or additions you make (to extracted data) will be updated on the map. As we add BlurbBits to our new Blog Posts they will automatically appear on the map, we don't have to do anything!! Yes!!

GeoTag and Educate with Wikipedia

We like to share more than just our photos,blogs and journals. If you've read our Blog you know we frequently refer to Wikipedia articles so that reader can learn more if they are interested. A nice quick introduction through our travels with some notes, to a full on encyclopedia at the ready.. the reader can choose!!

Wikipedia is a great free online encyclopedia FULL of information AND geotag data. Most geocoding services are focused around address etc but Wikipedia covers almost everything. I've found Suwarrow in the Cook Islands (no full time inhabitants) and Niuatoputapu in Tonga both rather remote by modern standards of travel. They even had Onotoa the first place we went that wasn't in our Lonely Planet.

Go to the Main Page and enter a search string in the left hand side. Find the article you are looking for and note the top right hand corner. If there is a globe with a link click the link to open the Geo Hack Page. Look for Coordinates (second line) and enter the decimal value into the BlurbBits Mapr Center Lat,Lng,Z: text box, and select Move. You can also enter the decimal value directly as an &llz= parameter (add a ,zoom value if desired).

This is a great place to search for more information and who knows, you might even learn something while you're there. Save the path so you can add a link to your blog/website. If you find an article that doesn't have a reference but you find one, consider adding it to Wikipedia.

The Ultimate Off Line GeoTagging Combo

We use Google Earth at Sea on Billabong (without Internet!!) to help in areas where charting is poor. It is amazing how good the imagery is, you can clearly see most reefs and in some cases you can even find the sandy patches where you want to set your hook. First you must visit the areas you are interested in while connected to the internet. Keep an eye on the Streaming indicator which appears just below and a little to the right of the Earth. When this indicator has reached 100% the imagery you're viewing is fully loaded and saved to your cache. Increase the cache size to get the most out of your data and you can even use the Touring Places feature to automatically store data based on a set of placemarks (ie. Markers) you setup.

As if that isn't cool enough, Picasa has a geotagging feature that works directly with Google Earth. You can even use your saved GPS tracks to import into Google earth to help find the date/time and position for your photos. There is even a program that does it automatically. The problem is most people either don't have a GPS or haven't saved their tracks, so the manual placement mode via Picasa/Google Earth is necessary. The good news is once you've done it, the data lives within the photo as metadata so tools like Picasa and BlurbBits have access to it.

If you have GPS tracks saved and want to get them into Google Earth check out GE GPS import (for the non free versions) or look into the ultimate GPS Utility (in and out of MaxSea, Google Earth etc) or a online translation program called GPS Visualizer. In most cases GPS data stretches the limits of the Static Map APIs 50 Point, however we are working on some potential solutions (Douglas-Peucker algorithm) but will certainly support it in our interactive maps (we've got 28,500 nM of GPS tracks.. We'll make something work).
BlurbBits Basics

BlurbBits Basics


So what exactly is a BlurbBit or a Blurb for that matter?

Blurb
Noun
  • A short summary or a promotional description, as on a book jacket.
  • On the Internet a blurb is used to provide a brief description or promotion of a larger work.

A standard blurb refers to words or written text, but in todays connected world shouldn't we leverage the available resources to enhance our blurb? We've tweaked the definition slightly: an eBlurb (electronic blurb) is just a blurb with optional photos, maps, videos, and links added to improve its effectiveness. The best way to explain a BlurbBit is to show you an example.

Stand Alone BlurbBits

How would you describe a 5 year, 30,000 mile Sailing trip if you had one chance? Photos are the first thought (we have 25,000), a map of our current location, maybe even a map showing our route.

This is a BlurbBit of our Sailing Trip w/Current Location (details below).


We feel our trip is best summarized by showing our entire route (colored by year) with some of our favorite photo albums. Clicking on the route map will load a detailed view showing our current location. Selecting the photo strip menu button (top menu) will load the albums, add a geo photos map overview button to the main menu, and display the photo options menu. This menu allows you to toggle on/off various photo overlays including captions, album notes, and/or the location map (if it has a geotag). Change albums by selecting the thumbnail or using the next/previous buttons. The photos IN each album can be viewed by clicking the open link button. A popup will appear showing the selected albums location and its photos can be loaded and navigated the same way as albums. Once photos are loaded, the geo-photos button will appear in the main menu along with a map link (in the sidebar) for each photo, both a detailed photo location and overview map are available. Well if a photo is worth a thousand words.. what's a BlurbBit worth?

BlurbBits can be installed and viewed almost anywhere that supports javascript. You can email or IM the link, embedded it in your website or blog, or add it as a link in sites that don't support embedded objects. The photos were extracted from our Picasa online albums and can be filtered to easily build a "focused" BlurbBit for a specific Blog Entry or Webpage Journal (Flickr is also supported).

GeoBlogging

Now this gives a pretty good overview and might get people interested in reading more about our trip, but it would be a pain (for us) to update it every time we move. Plus it only shows the photos and the maps, what about the journals or blogs about each location? What if we could add a geotag to our blog posts (creating a GeoBlog), so we could use the same BlurbBits viewer? Well you can!! In fact a BlurbBit (with a location) is used to define the blog post location. The results can be used to extract the data for various views of your blog.

Update:
if you use Blogger, we also support the new geotagged posts in addition to our existing formats, check out our examples including dynamic in Blogger maps. We've also documented a travel blog process which shows you how to turn your existing blog into the ultimate Travel Blog complete with maps and photos.

BlurbBits extracted from Blogger (click link to open):
  • "Where?" Blog Map View
    Extracts the Blogs most recent defined location and includes a link to the latest blog post.
  • GeoBlog Tracking Map
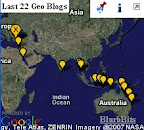
    Tracks the Blogs N most recent locations, can be filtered by date and category/tag.
  • GeoBlog Album of From The Galley
    This example extracts the first photo (and optional location) from each Blog post to build a Blog Photo Album.. Huh? .. oh just try it!! Each blog post appears with its photo, the notes will give a brief blog summary and the map will show the blog location (if available).
  • BBlinkInteractive Site Navigation Map


    BlurbsViewr ScreenShot

    This is all of our Sailing trip content including SailBillabong.com (videos, journals, photos) and our latest blogs from svbillabong.blogspot.com. Our Sailbillabong data was hand entered but each Blog location is automatically mapped using the extracted Blog location data and photos. Double clicking on the map icon or selecting from the list (upper right) will zoom to the location and open the selected content in the window below. If Quick Links is disabled (Map Options->Quick Links) a Page summary/photo is available for preview. The Map is fully interactive, check out the online help for more details.
  • And.. here's the best part. BlurbBits that extract data (like above) are automatically updated, you don't have to touch a thing!! Add or update a BlurbBit Blog post and your friends will get to see your latest location, check out your latest blog AND track your trips progress, auto-magically!!
Remote GeoBlogging or MoBlogs:

If you are in a remote location that doesn't have direct internet access, you can use Mail-to-Blogger to define the Lat/Long location through the text format. Based on the History of BlurbBits, this one was of the most important features.

Update: we've added a post specifically on Mobile Blog and Photo support. We even have a post dedicated to remote Photo editing and organization in Picasa, for the times you have your computer but no internet connection.

Geo This, Geo That..

Wow entering all that geo-data seems like a lot of work. Defining the Blog Post location is the only extra work involved, the photos and photo/Blog location maps were automatically extracted from the Geotagged photos/blogs. Geotagging 25,000 photos is a lot of work, especially if you try and do it all at once. But BlurbBits doesn't need any of the information described above to function.

Do you:
  • Have photos in Picasa or Flickr?
    You can use it as a simple photo viewer, with or without geo-tagged photos!! Then you can enhance it with a map of location and/or your travel route.
  • Want to build a simple map? Try your house, your boat, your favorite places.
  • Have photos in your Blogger Blogs? Extract a Blog Album.
  • Have a general feed (geo tagged or not) that you want to put on an interactive navigation map? Extract it into the BlurbsViewr.

BlurbBits are designed to Grow

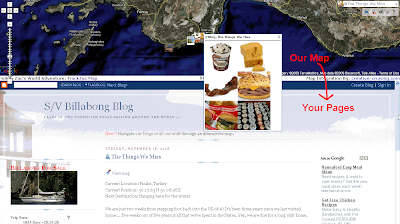
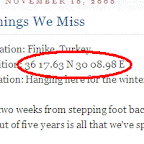
You can start with a simple email from the middle of the ocean, include your location, a small note about what's happening and we'll add it to your map (with Mail-To-Blogger you can even attach a small photo). Once you get re-connected to the internet you can upload your photos to Picasa or Flickr and add the photos you want to each BlurbBit (by album, pruned by tags, sets etc) while you update your blog with any additional notes or reflections. Then once you finally edit all your videos and compress them into something viewable, upload them to youTube and include them in your existing BlurbBits (coming soon).


Update: We've documented a complete Travel Blog process for Blogger. It can be used for other blogs that have RSS feeds however some of the commands may be slightly different.


You might have noticed we haven't mentioned login, upload to our site, load into our database etc. We have a hard enough time trying to keep track of our own 25,000 photos, let alone trying to manage yours. Blogger, Picasa, YouTube, Flickr and others all have 100's if not 1000's of engineers working to provide you the best and most up to date experience in their respective domains. We want to leverage that success and add to it, not compete with it.

We use existing data (extracted from RSS feeds) as much as possible, but we realize that some sites don't support feeds. In the future we are planing to add a database to allow searching and online storage but in the mean time there are plenty of things you can do to start preparing your data. Check out the BlurbBits Mapr help and look at the examples to get started.

Take your time and plan your content: think about how you will use albums, sets and/or tags/labels to divide your content. Tag/label your favorites and add a single tag to all your photos that is unique (like sailbillabong.com). Add captions and album notes. Start geo-tagging photos or keeping a location log for later use. The good news is you can always update the data later, and BlurbBits will automatically see the changes. Yes it may seem like work and it will take some time, but organization usually does. Once the photo data is available, you'll be able to use lots of very cool tools (including BlurbBits) to shuffle through it and slice and dice it into different views at will!!

Additional advantages

BlurbBits has some advantages over most traditional embedded photo viewers/maps and those users adding individual photos into each post. Even if you are "just" a simple blogger, you have entered the world of website design and the constant balance between performance and visual content. Surveys suggest that if your page doesn't load in 8 seconds, you'll lose up to a 1/3 of your visitors.. but photos, maps and gadgets all enhance the attractiveness of the site, so it's a fine balance. Some bloggers add as many gadgets, photos, and wizbang features they can think of, hoping to increase the chance that something will catch someones eye, but instead end up losing viewers who aren't willing to wait.
  • Embedded Maps
    BlurbBit maps use Google Static maps for speed while still allowing the user to zoom out/in to see another view and they can extract data from existing sources. The ability to combine maps with photos and travels routes makes it easy to add a single BlurbBit to a blog post or site. See the BlurbsViewr for interactive mapping options and a list of advantages over traditional interactive maps.
  • Embedded Photo Viewers
    BlurbBits are designed to load the photos only when the option is selected. This speeds up page loading and allows users to skip things they've already seen, without having to pay the performance penalty of reloading all the photos again and again every time they revisit your site (like a sidebar photo slideshow). A BlurbBit provides a single photo as a visual reference to both the blog viewer AND those viewing it through your feed. Most Embedded viewers or gadgets don't support feeds, in fact they are removed completely. If you take a look there is usually nothing in the spot where the slideshow or embedded map appeared on the original page. Check out our svbillabong.blogspot Feed to see how the BlurbBits appear!

  • Geotagged Photo Viewer
    BlurbBits is a one of the first geotagged photo viewers designed around the photo not the map. There are literally 100's of different ways you can view photos ON a map, but there are actually some people who don't like to use interactive maps (yeah crazy I know). They don't want to wait to load an interactive map only to get lost trying to find what they are looking for; the simple answer to "where was that?". BlurbBits allow you to add additional map information (route, track etc) to help enhance the photos that are about to be viewed.

  • Individual Photos
    Photos are great because they provide a quick visual reference to a subject mater in the text, but they are a pain to add to your blog. You have to format the text so it looks good around them, and re-add captions and notes you've probably already added in a photo editor somewhere. If you add too many photos, you'll slow down the page load.. AND .. you have to decide what size photo to display: too small and Grandma can't see them, too big and the blog text is harder to read. If you make changes to captions and notes (in the source data) you'll have to change them everywhere the photos are used. With BlurbBits, if you add/modify photos or change captions/notes, all the changes will appear in the BlurbBit automatically.

I like to have the BlurbBit near the top and add most of the text portion of the Blog Post below, after you've got the reader hooked. If you really need a visual reference for the text, try using a smaller version of the photo and highlighting the larger version in the BlurbBit.

There are other performance options that we'll describe in more detail later in a different blog , when we get a chance.

Group Emails for Journals

As you can imagine, we've met a lot of new people through our travels. An amazing number use group emails to communicate. What about the new friends you'll meet? How do they catch up on your travel history? Do you save and re-email old journals?

Get a blogger account and setup the Mail-to-Blogger option. Add the specified email address to your group email list and you are done. Your Blog will be an automatic archive of your emails AND you can even add a map and/or photos if you want. Now your new friends can "catch up" and your old friends have a place to go when they don't want to rifle through emails trying to find out where the heck you are.

Check out svbillabong.blogspot.com, most of those blogs were emailed from sea.

Update: We've add a Getting Started post to give you some pointers on where you could start.
BlurbBits History

BlurbBits History

The idea of BlurbBits started during our 5 year Sailing Trip around the world. We rarely had access to the internet and if we did it was usually slow AND expensive. We started adding Blogs through email (using Mail-To-Blogger) during our second year. We could update our friends and family from anywhere, literally from the middle of the ocean.

We always reported our position at the top of each Blog which I'm sure was treated as gibberish to most non-sailors who saw it. At this same time, we started using Google Earth and Satellite photos to help us find anchorages in remote poorly charted places while saving our GPS tracks for each leg. I was getting into mapping in a big way.

A couple years later, I wanted to create a web page that would allow me to upload a small blurb about our day at sea while building a historical track of our positions. We were heading into the "pirate" areas of the world and I thought a small photo and a quick note might ease some fears with our friends and family (something like "hey look we're still OK and here's a photo to prove it").

The problem with most people is that they think an update to friends has to be HUGE. Now that is impossible via email from sea but we found a little blurb here and there really helped everyone. It even helped us remember things when we went to add more details and photos, it was our base to build on. In fact once we got to port we wished our friends and family members had been keeping little blurbs about their lives.

When we finally had a little down time I investigated hundreds of options to help make this available to friends.

Key Features:
  • Easy to use with common software (i.e. support groups, help etc)
  • Must support Email posting including optional photos
  • Extensible to existing websites and blogs
  • Must be able to add and update Photos, Text and geotag Locations
  • Must use common photo management web services (Picasa/Flickr). i.e. No special uploads of photos to custom blog/website.
  • Should support non-Web based management of Photos
  • Must support multiple data entry options. i.e. Web based GUI and text file or spreadsheet entry
  • Auto generation of maps with different views
  • Easy to share through embedded gadgets, links, and email/IM
  • Should use common web standards if available
  • Should be available to users viewing through Feeds
  • Must be Free (hey my friends are cheap)

What I found was that although bits and pieces were available, not everything could be had in one spot. So I wrote BlurbBits. It was really written as a bribe to get people to take the time to enter Location data specific to their Blog Post, Web pages, Photo Album or Photos. Wouldn't it be cool if you could combine your maps, photos and journals in one easy to use place?

Welcome to BlurbBits.. and this is just the beginning!!