BlurbBits (an introduction)

BlurbBits (an introduction)


Sharing your travel adventures can be a time consuming experience. Writing updates, journals, editing/organizing and selecting photos/videos, adding captions, mapping locations, tracking your travels and then formatting them all for a website, blog or email can sometimes become overwhelming. We've been Sailing for 5 years and have over 25,000 photos, 30,000 miles of GPS tracks, blogs, websites and videos, so we understand the need/importance of easy to use methods for sharing your travel adventures.

BlurbBits is a FREE set of utilities designed to help ease the entire process, while providing easy to share viewing/mapping options even while you are disconnected from the internet (95% of our Sailing Blog posts were emailed). We are trying to revolutionize self published Travel Blogs, Sailing Blogs, and Photo blogs by using existing best in class functionality (Blogger, Google Maps, Picasa, Flickr, YouTube etc).

Spend your time sharing the moments, not formatting them.


BlurbBit Examples

We've designed our geoblogging process around a simple (but performance optimized) BlurbBit that can be used to add a map of your location or a map and photos in a single step instead of adding photos/captions and maps one by one.
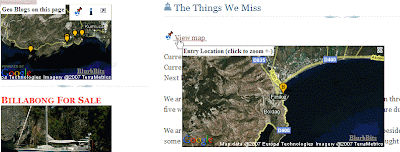

Mapping Options

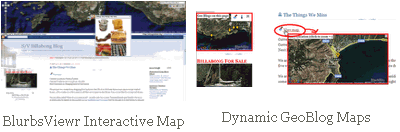
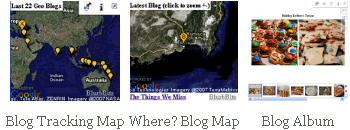
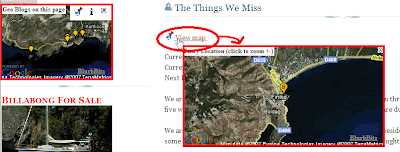
Once we have the location you can extract your current location, track your travels, create a Blog Album, and build an interactive map, all views will be automatically updated as you continue to share your travels.


Extracted BlurbBit Examples

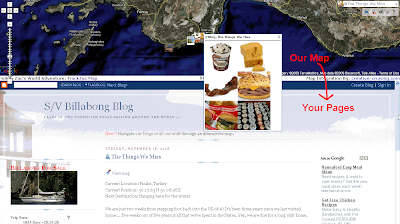
BlurbBits can be added to a website, blog post or sidebar and emailed or linked into existing sites and social networks to optimize your sharing options.

To see BlurbBits in action visit svbillabong.blogspot.com. To learn more check out BlurbBits basics, our getting started overview or if you are already familiar with Blogger, the geoblogging process, if you can send an email.. you can blog and map!! Update: the easiest way to get started with Blogger is to add the Dynamic GeoBlog gadget and add Lat/lng text to the Blog posts you want to map, we'll take care of the rest. Check out our utilties and other examples.

Sharing Your Travels (without Internet)

Most travelers don't have the luxury of constant or high speed internet access to manage a blog/website and photos. You enjoy the experience, take some photos/notes and then the work begins. If you use Blogger you may already know about the Mail-To-Blogger interface. We write 95% of our blogs this way. We use a lat/lng string to define our location and can even send a small (250x250) photo if the email utility supports attachments (this gives people an update, a location map and optional photo). We edit/tag and caption our Photos in Picasa remotely while traveling or at sea/anchor. When we get connected again, we upload our favorites to either Picasa or Flickr and add a BlurbBit (with map) to the remotely emailed blog posts (since developing BlurbBits we've starting adding more photos to our blogs). Since a BlurbBit is a single widget, it can also be easily added after the fact.. write first, then edit/caption/organize your photos and add them when you are ready OR you can highlight photos along with any thoughts/reflections you've had to create a new trip summary. All of the extracted views and maps will be automatically updated with new entries or changes.

If you use Picasa or Flickr, you know about free online photo sharing websites. They manage the disk space, backups & organization and allow users to search photos by albums, sets and/or tags. BlurbBits uses this data to extract a collection of photos that can be added directly to your blog or website (or emailed etc). If changes are made to the photos or more are added, they will automatically appear in your BlurbBit (on your webpage). Adding a location, adds a map along with the photos AND defines the blog posts location so we can map it all!!

If you have another website, a blog is an easy way to keep people updated on your most recent travels without falling behind. If you have your content scattered around the web it can be hard for your readers to find it all and follow your adventures. You can still keep your existing site, in fact you can combine all your sites together into an interactive navigation map that allows it ALL to be viewed on a persistent map along with your travel track (actual or estimated). We manage the map and flip through the pages on your blog/sites. You can even generate a Blog Album to add to your existing site.

If you are simply not into blogging you can keep a simple travel log that allows mapping from a text file (interactive version) you maintain on your computer (it must be uploaded to Google Spreadsheets to gain web access). If you don't know your exact location or zoom level leave it blank, it is the Mapr scratchpad format so you can load it and easily map/adjust your locations there.

We will constantly be adding new functionality and notes, so keep checking this blog.

Traveling Tips

We also run creative-cruising.com with lots of helpful Travel/Sailing tips about what works for us out here including Computers@Sea (backups, utilities, supplies AND using Google Earth without internet) and for you cruisers some Sailboat specific fishing tips!!

Feel free to contact us if you have any questions.
Setup Help

Setup Help

Update:  A New Blog should NOT be difficult to setup (for modern templates, screen sizes). We have been investigating Posterous and have created a community blog and a technology blog. Posterous is an dead-simple email based service that also allows auto posting to facebook, twitter and other services.. a key part to any successful blog.

Please Contact Us for the latest setup options and service, including social media and community integration.

We can help

For a $50 fee (via paypal.. fully refundable) you get..

Your own blog (if you don't already have one) with..

Custom Blog template
  • Automatic GeoBlogs Map and expandable posts
  • Custom Two sidebar layout
    Optimized for both small (1024x768) & large (1680x1050) displays.
    Most current templates are designed ONLY for small displays and leave too much blank space. With our template, the outer sidebar should be considered a "bonus", but is available for both display sizes (smaller requires scroll).
  • Subscribe To Links, Blog Archive, Labels and Latest Updates links
  • Menu bar with Default About Us and Our Link Pages
    See Post Pages for Blogger instructions
  • Comments and Reactions setup on Full Post view
Additional Features
  • Configure default post template (for expandable post text and lat/lng formatting)
  • Setup/test Mobile Blogging option (Blog Send)
  • Optimize Comments (turn on comment moderation and Registered users)
If you want to try before you buy, contact us and we'll give you an email link to our sample blog (which is also an example of what you'll get).

Additional Options

We can also discuss custom options including combining your new blog with existing sites, custom maps and analytics, adsense or feedburner setup however it will be on a case by case quoted basis.

We can also map existing trip summary data (winlink, pangolin etc) or by a date, location basis, or add custom backgrounds and photos. We can even map existing GPS or chart data.

What we can't do..

If you look at this site (and our others at the top of this page) you'll realize we spend too much time helping others (at no charge). We cannot be a consulting service for Blogger questions/issues when there is plenty of help available online.

Whatever you read, blogging is not a get rich quick scheme, nor do we treat it that way. We offer our help and support freely, not as a money making venture. The sites above represent literally thousands of hours of our efforts, and to date we have made less than $500. This doesn't even cover our web hosting services, We hope you understand!!

If you do feel like contributing, please visit our travel store for some options.

Contact us for more details.

We are also available for consulting on various aspects of the cruising lifestyle. Getting yourself ready, boat/equipment preparation, route planning etc. We also have lot's of free tips at creative-cruising.com.
Getting Started - BlurbBits Utilities Overview

Getting Started - BlurbBits Utilities Overview


We've been adding a lot of new functionality and documentation so it's time to try to answer the question: What is the best way to get started with BlurbBits?

First make sure you've read our introduction or the BlurbBits Basics to get a high level understanding of our basic capabilities and concepts. It also helps to understand how to create a BlurbBit (url parameters, our interactive examples and publishing options). Remember our goal is to reuse as much information as possible, so check out our data extraction parameters before you start. We even document a complete geoblogging process but it helps if you understand the high level summary first..

BlurbBits - summary

BlurbBits are performance optimized map and photo sharing solutions for your blog or website. Standalone BlurbBits define a map and/or set of photos for a specific location or topic (the bits). Instead of adding photos one by one (a major hassle) and/or linking to a separate map or photo album, BlurbBits can be used to quickly add all the photos/map into a blog or website. Photos and maps are viewed directly within the BlurbBit on your page without forcing users to other sites or pages. Extract BlurbBits summarize data from various sources into overview maps and/or albums depending on the parameters.
  • Quick customized maps (standalone)
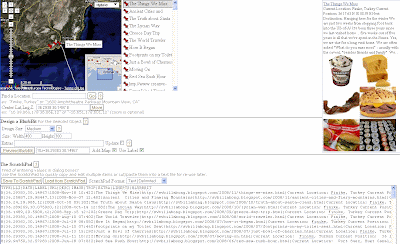
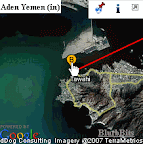
    You can adjust markers, zoom levels, location, travel path, map type and initial view. These parameters are also used to customize extracted maps. Location maps (&llz) also define a blog post's location when added to an individual blog post.
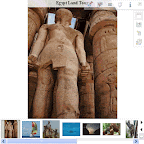
  • Online photos (picasa or flickr)
    Manages multiple photos from Albums or sets, with or without geotagged data from a user, group or other public data (does NOT define a blog post location). Changes made to the online photos will be seen when the BlurbBit is reloaded, automatically keeping your blog photos up to date.
  • Combined Maps and Photos
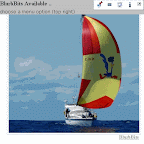
    The parameters from the sections above can be combined into a single BlurbBit which shows photos and defines a blog post's location. This can be used to manage all the photos and map for your blog post in a single utility (ie. widget/gadget) while allowing us to map your blog posts.
  • Summarize Data
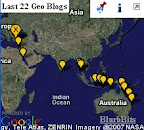
    Create summary maps/photos from existing data using extraction options. Note: extracted data cannot be used to define a blog post's location, it must be defined using the LLZ map parameter (or via the mapr).
  • Publishing Options
    BlurbBits can be added to your blog (post or sidebar), website or emailed and linked using our publishing options. Use the Embedded Options (and Blogger BlogThis) to add a BlurbBit into a blog or website. Links can also be used in sites/blogs that don't support javascript. Our Gadget overload post might help you understand our thoughts on post vs sidebar publishing.

Utilities & Tools


BlurbBit Interactive Examples (in this Blog)

The interactive examples of the various sections can be used to learn about a specific set of BlurbBit features. Click on the icon to see the BlurbBit. Text entered in the textbox will be passed as the BlubBits URL parameters. Most parameters can be combined with other section parameters.

Design Mode (within a BlurbBit)


A BlurbBit in design mode displays the publishing options for the i (info) menu button instead of the standard info/sharing options. The interactive examples and the BlurbBits Mapr automatically enable design mode. Url parameters can be manually appended to the BlurbBit Url and published using this mode.

Dynamic GeoBlog Maps

Blog Before Dynamic Maps

Blog After - with Popup Map Displayed

Dynamic Geoblog Maps are created on the fly based on a specific pages content. A popup map (within the page) is created for each geo-located post along with a dynamic GeoBlog summary map for the pages content. Update: we've added some new functionality which will enhance your blog's performance even further.

BlurbBits Mapr


The BlurbBits Mapr has two purposes; to create & position multiple standalone BlurbBits and extract & position existing data via RSS feeds or the scratchpad. Existing online content can be extracted using Url parameters and the interactive examples can be easily added to a location to map it (using the extras dialog box). Scratchpad data can be published to the web via Google Spreadsheets and extracted into BlurbBits (a quick summary) and the BlurbsViewr (interactive navigation map).

BlurbsViewr


The BlurbsViewr uses the Url parameters (photos and extracted) to display objects on an interactive map. The map stays persistant while pages are opened below, making it a perfect tool to navigate your geo-referenced data. Use the Scratchpad/Google Spreadsheet to define your own data or combine multiple sources.

GeoBlogging Process

All of the above functionality can be used as a complete geoblogging process that supports remote posting, post centered photos/maps, and interactive Blog map, Dynamics maps and mapping of historical data combined with other websites (for a Travel blog, geotagged photo blog, any geospacial data-- geoblog). With Blogger you have a lot of mapping options that are great for combining with existing sites. Best of all it's free.. try it today!!

Start by playing with the interactive examples to see what standalone BlurbBits you can add (they are the fastest way to improve your site and see what data you already have). Get a basic understanding of the Mapr and the geoblogging process before you go too crazy.

What data do you have?

Photos in Flickr or Picasa work best with albums/sets and can be filtered further using tags to match content or location. Captions will automatically be added if available and remember you don't have to add/edit EVERY photo, they can become just like gadget overload if you are not careful. The mapr is the easiest way to combine photos with a map (to define a post location). If you use Picasa Web Albums, map them in Picasa first and use the Mapr to build a BlurbBit map Album.

If you just want to build an interactive map of your website/blog use the Mapr ScratchPad, at some point you'll need to define each location. If you have existing data you can reuse it by supplying the correct extraction parameters to the Mapr. The scratchpad is just that, so make sure you save the data so you can reuse it later. Try mapping a couple of locations and working through the process before you do them all.

Create a Travel Log

You can easily map your travels by building an electronic travel log in a Notepad text file (like this). Use the BlurbBits Mapr to Load the Scratchpad data (cut & paste your text), If you don't know your location, leave it blank, you can find it using the Mapr Find a Location features. Adjust the positions and set your zoom levels to highlight the correct area (zoom=8 middle of the ocean zoom=12 or 15 for anchorages with good maps). You'll need to upload the file into a Google Spreadsheet in order to map it in the BlurbsViewr.

Later, if you want, you can add photos and links to other pages, like your online photos, your website, wikipedia, or combine it with your Blogs (like this). Creating a BlurbBits enabled blog is the most automatic way of tracking your travels but using the travel log is a great start and it sure beats entering position after position into dialog boxes.

Blogger Mapping Options

Blogger Mapping Options

1/17/2010 Update: Blogger's Geotagging method is still only available in draft mode after over a year. It has been broken a couple of times and there is still no Blogger supported method for geotagging posts via email.

Note: This post was originally posted on BlogsMapr (our BlurbBits Blogger playground). We wanted to test/support the new Blogger-in-Draft geotagging editor and answer some questions about why you'd want to geotagged posts (can you believe they asked?). We continue to use BlurbBits in our Sailing Blog (via standard Blogger) because it supports remote blogging, has more configurability AND you can specify a locations zoom level on a post by post basis. We have a documented migration path for when the editor becomes more mainstream (and by then we'll be sure to have a utility).

Now What?

You've defined post locations via Blogger-in-Draft, our position text input (for Mail-to-blogger) or by adding stand alone BlurbBits to your posts (to add routes and photos etc).. So now what?

Well we've been GeoBlogging for 3.5 years, using Blogger to track our 5 year 30,000 mile sailing trip, so we've got some ideas and some tools. Here are some cool things you can do with BlurbBits and related utilities.
  • Blogger Popup maps and a Dynamic GeoBlog Summary map
    Each post with a defined location will have a popup map within your Blog. In addition, a GeoBlogs on this Page summary map is dynamically created based on the posts on each page. If posts are filtered by searching, labels or selecting an archive month or year, the map will automatically change to show only the relevant geoblog posts. It's a great way to visualize blogs locations for a year or specific area (via label).


    Open our Sailing Blog (standard Blogger) or BlurbBits Playground (Blogger-in-draft) and notice the View map links. They were automatically added via our gadget.

    Click on the link to display a quick Google Static Map of the location directly within Blogger (no new page to open). An additional click, in the map, will display the zoomed out view. Try selecting a Blog Archive month and watch the Geo-Blogs map change.
  • Navigate your blog via an interactive map


    Not only do you get to see your blog locations on an interactive map, we also extract a summary of each post and the first photo for a preview. We maintain the map and open your blog pages directly in the window below (select from the list on the top right or click the [more] link in the preview). The map stays persistent allowing the user to smoothly navigate your geoblog posts.


    On the Add Page Element page click Edit Content and adjust YOURBLOG to the correct location (ie. YOURBLOG.blogspot.com .. blogsmapr for this Blog). If you use FTP posted blogs change blogger=YOURBLOG to bloggerid=BLOGID (blogID=XXX in the post editor URL). Click here for more BlurbsViewr details and options.
  • Extract a map for selected Blog posts to embed or email. Maps can be customized based on the desired number of posts and/or filtered by categories/labels. Click the i Info button to select various publishing options. The BlurbBits in the sidebar were extracted from other blogs. Learn how to adjust the widget size for sidebar vs post installs.
  • Create a "Where Blog map" to embed or email showing the latest geoblog location with a link to the latest post. Same as above using &mv=where and &mi=in.
  • Create a GeoBlog photo album. This method extracts the first photo (so make it good) and the post location to create a photo album for the blog. Posts which are geotagged will appear with a Location map button. A short blog summary can be previewed by selecting the notes button. Add &bp=1 to the extract a map example.

    Photos stored online with Picasa or Flickr can be displayed in the same album BlurbBit format, examples are scattered throughout all our blogs.
Check out our BlurbBits basics section for more details. Most of our sailing blogs were created using Mail-to-Blogger and updated once we got to port and an internet connection.

To see all of our online Sailing content including our Webpage journals and photos, Youtube videos, Blogger posts and KML GPS tracks click here. This data was entered in the BlurbsBits Mapr scratchpad which can be uploaded to the web via Google Spreadsheets.
Blogger Gadget Overload

Blogger Gadget Overload


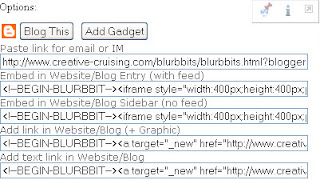
You may have seen this banner after you've published a Blogger blog. When you click on the link you literally get thousands of gadgets that are available to add to your Blog sidebar. I've seen plenty of blogs slowed down with too many sidebar gadgets; remember it says choose from thousands, not add them all.

What's the Problem?

The sidebar gets loaded for each and every blog post/page that is viewed. This is fine for some gadgets that change dynamically or load quickly, but for others it just slows down your page load times. Maps and Photos are the perfect example. Once a user has seen the map or looked at the photos they are done. They don't need to see them over and over again, yet they will continue to pay the performance hit EVERY time they visit ANY post/page on your site. Also, the sidebar gadgets are only available within the Blogger environment and are not viewable to followers and those who use your Blogger RSS feed (blog posts are). You wouldn't put a blog post in the sidebar, so why do people put too many gadgets in the sidebar? .. because gadgets make it easy!!

BlurbBits can easily be added to either the side bar or the blog post, just think of them as gadgets that can be published in posts!!

Performance Matters

Even if you are "just" a simple blogger, you have entered the world of website design and the constant balance between performance and visual content. Surveys suggest that if your page doesn't load in 8 seconds, you'll lose up to a 1/3 of your visitors.. but photos, maps and gadgets all enhance the attractiveness of the site, so it's a fine balance. Some bloggers add as many gadgets, photos, and wizbang features they can think of, hoping to increase the chance that something will catch someones eye, but instead end up losing viewers who aren't willing to wait.

If you have a "global" blog you also need to think about users who use older/slower computers with slow internet connections. We frequently get bogged down and frustrated with slow pages during our round the world sailing trip.

Add a Post

Our solution for complex/slow loading or one time use features is to add them to a separate blog post. The slow loading code gets loaded once, and only after the user has chosen to view it. We've also tried to make it just as easy to add a BlurbBit to a blog post as it is to add a sidebar gadget (via publishing options). Update with the new additions to our Dynamic GeoBlog maps you can increase your performance even more by adding slower loading items in the expanded post section and/or adding BlurbBits as links (to posts or the sidebar).

Another reason people add a sidebar gadget is to highlight/feature specific content. You can still highlight posts using a link or HTML/JavaScript gadget which points to your post URLs. Make sure you get the correct URL by clicking on the Title of the post you want to link to (the format should be BLOGURL/YEAR/MONTH/title.html). We use the HTML/Javascript gadget because it is the most flexible. You can have simple links (like the getting started links on the top right) or image links (like svbillabong). See Blogger's guide to basic HTML or this page for more details.

BlurbBits-Sidebar vs Post

We've optimized the performance of BlurbBits for both sidebar and in post use. When BlurbBits are used with online photos the photos are not loaded until the user selects a photo viewing option (improving load times). Most embedded slideshows load the photos and degrade performance during the critical initial page display (including those with autoplay disabled) even if they are way down on the page or sidebar and are not even viewable to the reader.

We use Google static maps in our BlurbBit maps to enhance performance for both in post and sidebar maps. We don't force our slower loading interactive map on everyone, but instead allow users to chose it through our sidebar link gadget. And once we open our interactive map we keep it open (and persistent), changing your blog posts instead of rebuilding the map on every page (as a standard sidebar map does).

We also offer Dynamic GeoBlog maps which are perfect for the sidebar. The map changes automatically based on your blog pages content. Your latest location will appear highlighted on your blogs home page, while an archive or label selection will show your mapped locations for the selected period or label. We even add a popup map within Blogger to highlight a post location for those that were emailed remotely or end up hidden by partial post methods.

We are not suggesting you get rid of all your sidebar gadgets, just suggesting that you think about the usage model and decide whether or not to add a BlurbBit as a sidebar gadget or in a post (see publishing options). Here are a some good sidebar uses:
  • Picasa Albums SideBar
    Since this BlurbBit opens each album (via Open Link) in a medium BlurbBit popup, the user can see photos for all your albums quickly. New albums or changes to existing albums will automatically be updated. An individual album can also be published to a sidebar BlurbBit but it is much nicer in a post size BlurbBit. See Online Photos for more details. Note: you can hide the top BlurbBit menu with the far right arrow button.
  • Travel Blog Tracking
    The Blogger extract parameters can be used to a quick blog history map or another blogs Where map. The BlurbBits will be automatically updated when changes to the blogs are made.
  • Travel Route
    Use the BlurbBits Mapr utility to quickly draw you travel route (planned or actual). Then load it into a route map sidebar gadget.
  • Extracted data
    We can also extract data from various sources including winlink, Google Spreadsheets, GeoRSS feeds and moblog photo maps.
Keeping up with the changes

As you start adding BlurbBits to posts it can be hard to keep your readers informed of the changes. The good news is all of your new BlurbBit post will appear at the top of your page (and in your feed) so those are covered. If you add BlurbBits to older posts or change a post date (to make the travel track work) the blog order can get jumbled and it's hard for existing readers to keep track of your updates (but better than miss-dating a post).

When we add major new features to our blog sidebar (like interactive maps) we usually write a "news release" post just to keep people in the loop (and focus them). You can also use a Blogger feed to get a list of changes. Just like BlurbBits, your Blogger feed can be configured via Url Parameters (see Blogger example and Full parameter descriptions).

You can use the orderby=updated parameter to see the recent changes you've made to your blogs (by date is the default) but this will show ANY updates you've made including small typo fixes etc. You can also search for blogs with a certain labels using the category=label parameter. If you label blogs with featupd (or anything else) you can combine the two parameters to get a feed for your featured updates. Then you can label/unlabel posts based on those changes you wish to highlight. See our example for BlurbBits latest Blogger updates. You can add this as a feed as a link in your sidebar. We are already prototyping some enhanced functionality for BlurbBit links!!
Dynamic Blogger GeoBlog Maps

Dynamic Blogger GeoBlog Maps

Since Blogger-in-Draft announced geotagging support, we thought we would add some quick maps to highlight blog posts locations. This gadget locates the geotagged posts on each blog page and adds a link next to the new location footer or at the top of the post for other BlurbBit/text tagging methods. Update: now it does even more (expandable posts, popup maps/photos).


Clicking on the link will display a BlurbBits map directly on the page within Blogger (i.e. no new windows/tabs for your readers to get lost on). If geotagged posts are found, they are also added to a Geo-Blogs on this Page summary map. This map will dynamically change based on the page content and is very helpful for visualizing the locations of posts filtered via searches, labels or archives. Visit our Sailing Blog for a Blogger example (with zoom level definition) or check out our Map your Blogs playground for a Blogger-in-Draft example.

With geoblogs on this page summary map

Click to Add (Blogger post location version)

Click to Add (lat/lng text version)

Without geoblogs summary map(popups only)

Click to Add (Blogger post location version)

Click to Add (lat/lng text version)

This gadget is only supported with Blogger layout templates (the default), contact us to migrate your old or custom non-standard template blogs.

Interactive Maps (non-sidebar maps)

Check out the BlurbsViewr navigation map for a great way to navigate your blogs from a persistent interactive map. We even have specific Blogger mapping options to add an interactive map button (and more).

Adjusting your dynamic maps

Edit the HTML/Javascript Gadget
  • Use pw and ph options to adjust the width and height of the resulting map popup.
    zooms is used to adjust the zoom levels for the resulting map (in and out).
  • Adjust the size of the Geo Blogs map via the "geomap" width and height style parameters.
    We also use it's background-color to customize the popup.
    Most other options are explained in the Customizing a BlurbBits map section. We will be expanding the documentation in the near future.

    Refreshing your Browser

    During the testing/modification of your blog posts and gadget it is necessary to refresh your browser to get the latest available data.

    Refreshing your Browser in Firefox
    • Press the shift key on your keyboard and keep it held down.
    • Click reload on Firefox's graphical toolbar menu.
    • Keep your finger on the shift key until you see the page reload.
    Refreshing your Browser in Internet Explorer
    • Press the shift key on your keyboard and keep it held down.
    • Select view from the Internet Explorer file menu and click refresh .
    • Keep your finger on the shift key until you see the page reload.
    New Geotagged Blogger Posts

    New Geotagged Blogger Posts


    We've been geo-blogging with Blogger ever since the second post of our Sailing blog back in June 2005. It is such a great way to track our travels and keep people up to date with not only what we are up to, but where we are. Most of our friends and family had no idea where Kiribati, Eritrea or the Maldives are, let alone the remote anchorages we love to visit.

    Blogger has just announced support for geotagging which is currently available only through Blogger in draft. This feature allows users to specify a location for each blog post and outputs it as a GeoRSS feed. Check out the announcement for some known issues.

    We have updated BlurbBits to support the Blogger GeoRSS output in addition to our existing text (for Mail-to-Blogger) and BlurbBit (including optional zoom and path) geotagging formats . This will allow users to view their geotagged posts in the BlurbsViewr (an enhanced blogmap) and/or extract various maps/views into stand alone BlurbBits.

    To learn more about BlurbBits start here or check out our basic BlurbsViewr Blogview.

    For Blogger viewing options with examples, check out our Blogger BlurbBits Playground.

    We are VERY excited about the new native Blogger Geotagging support and will be looking for additional ways to enhance your geo-blogging Blogger experience.

    Stay tuned for updates. Comments and feedback are always appreciated.
    Interactive BlurbsViewr Maps

    Interactive BlurbsViewr Maps


    Add a map to navigate your website or blog posts

    Interactive maps have been around for ages but most people embed them directly into their page. This means that every time a user changes pages the map needs to be reloaded and built again.. and again.. and again!! If your map has a lot of data this can be painful and time consuming and the view changes during each reload losing the continuity you were trying to gain by adding the map in the first place. Maps can be made quicker by only having one location but then what's the point, why not use Static maps or a BlurbBit (two zooms + title) instead?

    Now I'm sure you've also seen maps that allow you to navigate to other pages. They either stuff all the information in a tiny info window or open in another window or tab. To get to the actual page, you usually have to wait while the map adjusts the info window.. one click on the map icon, wait... , find the link in the info window and click it, find the tab.. uggh. I know because I used the exact solution for our sites.


    The BlurbsViewr opens your pages directly in a window below the map, allowing us to maintain the map while your site changes your pages. Users can navigate the context of the map and your pages quickly while maintaining continuity of the complete "picture". They can also find additional content nearby whether it's your own content, like photos or videos near the blog, or through optional layers like Wikipedia and Panoramio photos. Here's an example that ties ALL of our our sailing sites together: our SailBillabong.com Journals, Photos, You Tube videos and our svbillabong.blogspot.com blog. The map will open with a preview of our latest post and position automatically extracted from our blog.

    Use the drop down menu list (top right corner) to navigate the content or just browse the map (instructions under ?). If you want just a page preview first, disable the Quick Link Option (under Map Type/Extras). If our photos don't do a good enough job describing the area or you want to learn more, enable the Wikipedia and/or Panoramio layers.

    So there you have it, a full interactive map to navigate all your geotagged web pages and content. Please let us know what you think!!

    Note: This map data was hand entered from our SailBillabong site while the latest blogs are automatically extracted from the Blogger feed data and it's BlurbBits. We can automatically map GeoRSS feeds, geotagged photos, and blogs posts/Web pages tagged with BlurbBits (that also support feeds).

    If you use Blogger check out the GeoBlog mapping options and our Travel Blog process.

    Geotagging data

    If you have a feed (without geotags), try extracting the data with the BlurbBits Mapr and drag the entries into position on the map (don't forget about zoom). Save the data to the Mapr ScratchPad (text tab format) and upload it (or copy paste using Ctrl-C Ctrl-V) into a Google Spreadsheet. Share the spreadsheet and load it into the BlurbsViewr and you've got yourself a pretty cool map. That is the fastest way to get your non geotagged blogs/pages onto the map. Then you can use the data to add go back and add BlurbBits with photos and/or maps where desired (without them nothing extra will appear in your post or feed.. ie no links, photos etc). You can even combine the two, handling historical blogs with a spreadsheet while adding BlurbBits to your new posts.. the best of both worlds.

    If your site doesn't support RSS feeds you can easily build a spreadsheet that contains all the data (I said easy NOT quick). The basics are the URL for each entry, a Label and a Description and Type (required). Photos are optional but enhance the preview and the chance that users might click through to the page (you can add these later). Check out the ScratchPad format and options and this sample ScratchPad data.

    Url Parameters for BlurbsViewr

    All of the data extraction parameters and are supported by the Viewr (&bp=1 is redundant). Online Photos parameters can also be used if they have geotagged data.

    Other supported parameters

    &mtitle=map title (see Basic Setup)
    &mt=map type (see Customizing your map)
    &mv=where will zoom map to latest entry at initialization (if location is defined)
    &tt=travel Turn on the Trip Tracker
    &mi=in|out Defines the initial map view (latest entry or all points)
    &zoom=zoom Default zoom value for locations without a zoom
    &llz= (initial location) good for highlighting an area of your trip but not a specific point (no marker is added).
    &qlno=true disable quicklinks on initialization. Shows a preview first however it is important when custom maps are generated that do not contain URL links to pages (just popups).
    Cool Things To Try

    Cool Things To Try

    Here's some cool things to try with BlurbBits

    This assumes you have a little understanding of how BlurbBits and the BlurbBits Mapr work.

    Fun with Photos

    One of the main reasons we go though the effort of selecting, organizing (tagging and captioning) and cataloging our photos (into albums or sets) is for our own enjoyment. There is nothing like an album of your favorite photos to stir up some memories to reflect on past adventures.

    If you don't have a blogger account sign up for one. It's easy and you'll be Blogging in two minutes.

    BLURB-THIS - a BlurbBit & Blog for a Picasa Album:
    &picalbums=SailBillabong
    Photo albums from SailBillabong (try your Username)
    • UserName is your Picasa login name
      Login and check the path http://picasweb.google.com/UserName
      ex: use SailBillabong for ...com/SailBillabong
    • Learn More
    Open the Albums by clicking the Icon and make sure some albums are found for your account. You are also welcome to use ours as an example.

    Now run the BlurbBits Mapr with the album URL parameters from above (replace the & with ?). ex: ..setup.html?picalbums=SailBillabong

    This will load the Picasa albums in the sidebar and place those with a defined location on the map (ah the glory of data re-use). Click on an album and if it is not already placed, drag it onto the map and click to set the location (and current zoom). If you are using this album to define a Blogs location adjust it as needed. This is where it helps to use the LLZ to pin point the location/zoom and then drag the album to it. Adjust the zoom level if needed; find the zoom level you like and use RMC set Zoom. Adjust the Map or Photo Parameters as necessary (don't forget toggle to update). Try adding these for a start &mark=midredx&smark=tinyred (append to the end of the extras line) . Preview your BlurbBit, open the photostrip and select the photo you feel best summarizes the photos or thoughts. Make any adjustments and re-Preview. Once satisfied, select the i (info) button and click the BlogThis button.

    A Blog Your Bit popup will appear. Click the Login button and login into your Blogger account (you only need to do this once). Choose your Blog (if you have more than one) and then write your post; add more details about the trip, add any reflections you may have had or just describe the album. The BlurbBit will replace the [BLURBBIT] tag, so feel free to add text before and/or after. Select Publish Post. The unformatted blog will appear below as a preview, select the link to navigate to the actual blog post (or view Our Sample result .. cheater).

    Now that wasn't that bad, you've got a blog post describing your trip or photos, an entire albums worth of photos, complete with captions, geo-photo map, notes and a link to the Picasa photos online. If you have your photos tagged (or in sets via Flickr) you can easily filter them to a specific topic or location that you want to write about. Filter your Photos and write your Blog or write your blog and then find the photos that match your topic.. it's that simple.

    Then slice and dice the results into different views...

    Interactive Examples:
    &blogger=blogsmapr
    A Blogger map for blogsmapr.blogspot.com
    &blogger=blogsmapr&bp=1
    A Blog Album (blogs with photos only)
    &blogger=blogsmapr&mv=where&mi=in
    A BlurbBits "Where" Blog map with link to latest post and last known location.

    And ..
    An interactive Blog navagation map with similar viewing options (last location or full view).

    When you are finished with the Album don't forget to unset the update toggle or you will overwrite the other albums on subsequent previews. In most cases the update toggle is a good way to set the default preferences for many objects. Picasa albums are the only objects that come pre-configured (so far).

    If you want to add a path or route to your album, use the RMC to set the map to add line mode and use left mouse clicks to draw your line (use RMC to stop adding points). Then select the entire path description to the right of the Preview BlurbBit Button and copy it (CTRL-C or RMC copy). Select the album and paste the new path at the end on the Extras line. Don't forget to replace the ? with a & (we'll remind you). Make sure the Select Toggle is enabled and Preview your new addition. Double check your photo maps if you changed the zoom of your album location. If the line doesn't appear make sure the Select toggle in On!! (My Sample Route result).

    Now you added a travel map and favorite, last or average position to all the photos, not a bad way to enhance your blog. It doesn't stop there, if you have more than just a blog, you can map ALL your webpages. Here is all of our SailBillabong journals, photo albums (the old way), videos and our blogs (automatically updated).

    If you are using a public machine don't forget to logout of your Blogger account.

    An interactive Trip Photo Album map

    The good thing about maps is they give users a really good sense of your travel destinations. The bad thing is you need to define where you were in order to build them. If you already have geotagged photos they'll automatically appear on the Viewr map. If not ..the thought of geotagging 25,000 photos is mind boggling. The good news is you don't really need to geotag every photo to map them, just the albums or your own web pages that display the photos.

    Picasa albums are really easy because you only need to set one location per album and we automatically convert the album into a BlurbBit with all the photos.

    Run the BlurbsViewr with your Picasa Album
    ex: .../blurbsviewr.html?picalbums=SailBillabong

    Your albums will appear with the latest album highlighted. When you open the album (select from the list, click [more] or double click on the icon) the BlurbBit for album photos will open in the window below. Quick and easy way to navigate all you trip photos eh?

    There's more.. if your albums represent a single trip (like ours) you can create a rough Travel Track with the date and location of the albums. Add &tt=travel&mi=out to the BlurbsViewr album parameters (or Try Ours).
    ex: .../blurbsviewr.html?picalbums=SailBillabong&tt=travel&mi=out
    You'll find out VERY quickly how accurate your dates and locations are. Highlighting the Trip Summary will display the approx distance Traveled.

    If that's too much work to clean up, you can draw the lines in the BlurbBits mapr and save them to a Google Spreadsheet. See our Example with Drawn Tracks. These paths can also be used when creating a standalone BlurbBit of just the album to embed on your page.

    The ultimate trip photos map.. all of our individual geotagged photos and our drawn lines or you can overlay them with our actual GPS tracks (from KML).

    Remember if you don't use Picasa albums you can still use the ScratchPad to enter your data for each page and then use a GoogleSpread sheet to extract the data for the Viewr. You can even combine your photos and your blogs on the same map or heck do everything. Don't forget the best part, any changes or additions you make (to extracted data) will be updated on the map. As we add BlurbBits to our new Blog Posts they will automatically appear on the map, we don't have to do anything!! Yes!!

    GeoTag and Educate with Wikipedia

    We like to share more than just our photos,blogs and journals. If you've read our Blog you know we frequently refer to Wikipedia articles so that reader can learn more if they are interested. A nice quick introduction through our travels with some notes, to a full on encyclopedia at the ready.. the reader can choose!!

    Wikipedia is a great free online encyclopedia FULL of information AND geotag data. Most geocoding services are focused around address etc but Wikipedia covers almost everything. I've found Suwarrow in the Cook Islands (no full time inhabitants) and Niuatoputapu in Tonga both rather remote by modern standards of travel. They even had Onotoa the first place we went that wasn't in our Lonely Planet.

    Go to the Main Page and enter a search string in the left hand side. Find the article you are looking for and note the top right hand corner. If there is a globe with a link click the link to open the Geo Hack Page. Look for Coordinates (second line) and enter the decimal value into the BlurbBits Mapr Center Lat,Lng,Z: text box, and select Move. You can also enter the decimal value directly as an &llz= parameter (add a ,zoom value if desired).

    This is a great place to search for more information and who knows, you might even learn something while you're there. Save the path so you can add a link to your blog/website. If you find an article that doesn't have a reference but you find one, consider adding it to Wikipedia.

    The Ultimate Off Line GeoTagging Combo

    We use Google Earth at Sea on Billabong (without Internet!!) to help in areas where charting is poor. It is amazing how good the imagery is, you can clearly see most reefs and in some cases you can even find the sandy patches where you want to set your hook. First you must visit the areas you are interested in while connected to the internet. Keep an eye on the Streaming indicator which appears just below and a little to the right of the Earth. When this indicator has reached 100% the imagery you're viewing is fully loaded and saved to your cache. Increase the cache size to get the most out of your data and you can even use the Touring Places feature to automatically store data based on a set of placemarks (ie. Markers) you setup.

    As if that isn't cool enough, Picasa has a geotagging feature that works directly with Google Earth. You can even use your saved GPS tracks to import into Google earth to help find the date/time and position for your photos. There is even a program that does it automatically. The problem is most people either don't have a GPS or haven't saved their tracks, so the manual placement mode via Picasa/Google Earth is necessary. The good news is once you've done it, the data lives within the photo as metadata so tools like Picasa and BlurbBits have access to it.

    If you have GPS tracks saved and want to get them into Google Earth check out GE GPS import (for the non free versions) or look into the ultimate GPS Utility (in and out of MaxSea, Google Earth etc) or a online translation program called GPS Visualizer. In most cases GPS data stretches the limits of the Static Map APIs 50 Point, however we are working on some potential solutions (Douglas-Peucker algorithm) but will certainly support it in our interactive maps (we've got 28,500 nM of GPS tracks.. We'll make something work).
    Using Online Photos

    Using Online Photos

    The whole basis behind BlurbBits is to use existing online data when at all possible, so the last thing we are going to do is ask you to upload photos. We use web based photo services to extract data that is available; the photo, a thumbnail, date and time, location, caption, labels/tags, notes and albums or sets you might have created. The more data you have, the more filtering options you'll have available for BlurbBits creation. Currently we support Picasa and Flickr photos as well as extraction of a "Photo Blog Album" based on the first image in your existing site feed (if available).

    Note: if want to use photos and define a location for a blog post, make sure you define the post location. The easiest way is to use the Mapr to find/define the location/zoom of the post and use the Url parameters below to paste into the Mapr's extras textbox. The mapr can also be used to extract existing geotagged photo locations.

    If you use use another Online Photo Sharing site, please let us know and we'll add it to our list. If you don't use an online service consider either Picasa or Flickr. Each has their advantages and we use both.
    • Picasa has an off-line version that allows editing and tagging, which is great to use for organizing your photos when there is no internet.. i.e. sitting in a remote anchorage. Their online Picasa Web albums allows us to import all the data into BlurbBits.
    • Flickr has a large online community with comments, groups, and favorites but no off-line organizing/editing.
      We'll compare the two in more depth later.
    Adding Photos from Picasa or Flickr

    Once you enter design mode you should load the photo strip and choose a photo to "highlight" your BlurbBit. This photo will be added to the Embedded Object as a visual reference prior to loading the rest of the photos and provides the users viewing your feed with a photo and link to the BlurbBit.

    Note: you'll be able to adjust the zoom properties of the individual geo-tagged photo maps with the Photo Zoom option (see below). I usually run with a &pz=4 but if you try our first photos, the Marquesas Islands only supports &pz=2, &pz=4 causes a empty background for the map.

    Photos from Picasa

    Picasa supports a mixture of geo-tagged photos and untagged photos in the same data feed. This is very helpful if you are going back to update some photos (but not all). In BlurbBits the geotagged photo will appear with a map button, the other won't.

    Picasa User Photos: &picasa=UserName:Album:Options
    • UserName is your Picasa login name
      Login and check the path http://picasweb.google.com/UserName
      ex: use SailBillabong or sailbillabong for http://picasweb.google.com/SailBillabong
    • Album (optional)
      Select an album and check the path http://picasaweb.google.com/UserName/Album
      ex: use Sailing2005 for http://picasaweb.google.com/SailBillabong/Sailing2005
      Usually just the spaces are removed but double check for special characters just to be sure
    • Options (quess what? they are optional)
      If options are used without an album a blank space Must be used ex: username::tag

      • Tags: use tag=tag1,tag2 to filter photos by tags
        tags can be shortcut by leaving off the tag= ex: user::tag1 is the same as user::tag=tag1
        ex: sailbillabong:sailing2007:orangutan or sailbillabong::chris
      • Query: use q=query1,query2 to search the title, caption and tags
        ex: sailbillabong::q=chris,kt
      • advanced feed parameters such as max-results and start-index can be used
        Default: the first 100 matching photos will be shown
        Picasa does not support feed ordering and the photos are chronological order (first is first). You can use the start-index parameter to "target" the last 100 photos you want to show off.
        If added to other parameters the & must be escaped to %26 or it will be processed as a BlurbBit argument (and skipped by Picasa)
        ex: sailbillabong::q=chris%26max-results=3
        broken ex: sailbillabong::q=chris&max-results=3 (will return all photos)
    Interactive Examples:
    &picasa=SailBillabong
    The first 100 photos from SailBillabong (try your Username)
    &picasa=SailBillabong:Sailing2007
    The Sailing2007 album from SailBillabong (try Sailing2004,Sailing2005,Sailing2006)
    &picasa=SailBillabong:sailing2007:orangutan
    Photos matching the tag orangutan in the sailing2007 album
    &picasa=sailbillabong::chris
    Photos matching the tag chris in all albums
    &picasa=sailbillabong::q=chris%26max-results=3
    Get only 3 photos matching chris in all albums
    &picasa=sailbillabong::start-index=101
    The next set of photos

    Picasa User Albums: &picalbums=Username

    Albums are a great way to show off your photos. The user can browse your albums, their descriptions and maps (if geotagged). When open link is clicked, the selected album opens another BlurbBit containing its photos. It's very fast and easy way to allow access to all your public photos. If you map your album in Picasa first, you can use the BlurbBits Mapr to create a map and photo BlurbBit (example) which can be added to a Blog post to define its location and add the photos for the post (more details).
    • UserName is your Picasa login name
      Same as User Photos (see above)
    Interactive Example:
    &picalbums=SailBillabong
    The albums from SailBillabong (try your Username)

    Picasa Public Photos: &picall=Options:Number
    • Options
      Same as for user photo (see above)
      max-results is used by :Number so it's redundant
    • Number: Number of Photos (optional default is 25)
    Interactive Examples:
    &picall=q=sailing
    25 uploaded photos matching sailing
    &picall=sailing,turkey:50
    50 photos matching sailing and turkey
    &picall=sailing,turkey%26start-index=50:50
    the next 50 photos

    Try your own queries and see what you photos you find!!
    There are some strange tag to photo matches!!


    Picasa Featured Photos: &picfeat=Options:Number (default 25)
    • Options
      • all: use picfeat=all to get the first 25 photos
      • start-index: use picfeat=start-index=25 to get the next 25
        This is currently broken and has been reported to Google.
    • Number: Number of Photos (optional default is 25)
    Interactive Examples:
    &picfeat=all
    25 featured photos
    &picfeat=all:50
    50 featured photos
    &picfeat=start-index=50:50
    the next 50 featured

    There are some very cool photos here. Click on the Open Link button to popup the photo in Picasa to check out more our the users photos and albums.

    Available Picasa Photo Sizes:

    When you upload photos, Picasa creates a large selection of photo sizes. Matching your BlurbBit size to the available photo sizes will optimize the performance. We will automatically scale down the photos to fit into the window, scaling up can cause photo distortion and is not worth the performance gain. The available sizes are:
    • 72, 144, 160,200, 288, 320, 400, 512, 576, 640, 720,800
      measured in pixels along the the longest edge.
    Photos from Flickr

    Flickr requires an upfront choice with respect to geotagged photos. If you specify geotagged photos you'll ONLY get those photos. Geotagged data does not appear in the normal feed, so it is impossible to combine a mixture of geo and non-geo tagged photos into the same BlurbBit and show a map for only those that are geotagged.

    Update: you can also use idgetter to extract your User and Group ids.

    Flickr User Photos: &flickr=UserId:Options or &flickrgeo=UserId:Options
    • Use &Flickr for all photos and &flickrgeo for only geotagged
    • UserId is your Flickr Id
      Login, Select your photostream and find the Subscribe to xxx photostream (near the bottom) and click Latest.
      You'll get a page URL like ..public.gne?id=25998359@N07&lang=...
      The numbers and characters between the "=" and the "&" sign are your ID
      ex: use 25998359@N07 for ..public.gne?id=25998359@N07&lang=...
    • Options:
      • Tags: use tag=tag1,tag2 to filter photos by tags
        flickr tags cannot be shortcut

        ex: tags=market,tomatoes for market and tomatoes
      • Sets : use set=setid to show a set
        Use Flickr to navigate to Your Sets and select the desired set
        You'll get a page URL like ....sailbillabong/sets/72157606804117190...
        The numbers after set/ are your setid
        ex: use set=72157606804117190 for ..sailbillabong/sets/72157606804117190
    Interactive Examples:
    &flickrgeo=25998359@N07
    Our latest photos (switch to &flickr= and try your id)
    &flickrgeo=25998359@N07:tags=market
    latest geotagged with market
    &flickrgeo=25998359@N07:tags=market,tomatoes
    latest geotagged with market & tomatoes
    &flickrgeo=25998359@N07:set=72157606804117190
    A set from the market

    flickrgeo= could be replaced with flickr= (but we might as well show off our geotags)

    Flickr User Favorites: &flickrfavs=UserId
    • UserId is your Flickr Id
      Same as for user photo (see above)
    Interactive Examples:
    &flickrfavs=25998359@N07
    Our favorites, we haven't done much here yet just for testing

    User Favorites does not support geotagged photos or tags.. but we're asking Flickr for it!!

    Flickr User Friends: &flickrfriends=UserId:Options
    • UserId is your Flickr Id
      Same as for user photo (see above)
    • Options:
      • all: use all to show all photos of your friends
        The default is to show only one photo from each friend
      • or nothing (leave it blank for the default)
    Interactive Examples:
    &flickrfriends=25998359@N07
    Our friends first photo (want to be our friend?)
    &flickrfriends=25998359@N07:all
    All our friends photos

    User friends does not support geotagged photos or tags.. but we're asking Flickr for it!!

    Flickr Groups: &flickrgrp=GroupId or &flickrggeo=GroupId
    • Use &flickrgrp for all group photos and &flickrggeo for only geotagged group photos
    • GroupId is the Flickr Group Id
      Find a group, navigate to its Group Pool page and find the Subscribe to xxx group pool (near the bottom) and click Latest.
      You'll get a page URL like ..._pool.gne?id=33122952@N00&lang=...
      The numbers and characters between the "=" and the "&" sign are the GroupId
      ex: use 33122952@N00 for ..._pool.gne?id=33122952@N00&lang=..
    Interactive Examples:
    &flickrggeo=33122952@N00
    Outstanding Travel photos
    &flickrggeo=41425956@N00
    Travel Photography
    &flickrggeo=11488522@N00
    Visit the World

    flickrggeo= could be replaced with flickrgrp= (but geotags answer where's that?)

    There are some great groups that share some amazing photos, and BlurbBits is an easy way to view the GeoTagged photos. I guarantee you'll be asking "where is that?" more than once. You can easily get sucked in, there are almost 30,000 GROUPS with travel photos.

    Start here and contact us with any good ones you find.

    Click on the Open Link button to popup the photo in Flickr to check out more of the users photos and sets or use the info button to get more info on the photo and photographer.

    Available Flickr Photo Sizes:

    When you upload photos Flickr creates a select set of photo sizes. Matching your BlurbBit size to the available photo sizes will optimize the performance. We will automatically scale down the photos to fit into the window, scaling up can cause photo distortion and is not worth the performance gain. The available sizes are:
    • 75,100,240,500,1024
      measured in pixels along the the longest edge.
      Note that the Medium size BlurbBit will actually use the 500 size photo

    Advanced Photo Properties

    The Photo Zoom and PhotoStrip properties can be used to refine the views and performance of the photo within the BlurbBit view.

    Photo Zoom: &pz=Value
    • Value: the difference from the main map zoom levels. Default 0
      The Photo Zoom can be used to adjust the zoom levels of the individual photo map (if geotagged) to show close up detail of the area if available or desired. By default the zooms are set to the same as the base map. Be sure to check the availability of high zoom levels, in remote location the higher zoom levels are not support by the underlying Google Static Maps.
    Interactive Examples:
    &llz=36.2938,30.1497&mi=in&flickrgeo=25998359@N07:set=72157606804117190
    Individual photo map are the same zoom levels as the main map
    &llz=36.2938,30.1497&pz=6&mi=in&flickrgeo=25998359@N07:set=72157606804117190
    Same photos with PhotoZoom set to 6

    &llz=36.2938,30.1497,12&pz=2&mi=in&flickrgeo=25998359@N07:set=72157606804117190
    Main map zoomed in by 4 (via llz) + a small PhotoZoom (2)

    Don't forget to check out the Overview photo map once the photos are loaded. It will be zoomed to fit all the photo locations on the map.


    PhotoStrip Options

    ThumbNail Size &ts=size
    • Size is the thumbnail size in pixels. Default is 50
      Used to adjust the thumbnail size of the photo in the PhotoStrip
    Interactive Examples:
    &picalbums=SailBillabong
    The albums with the default ThumbNail size
    &picalbums=SailBillabong&ts=75
    The same with larger thumbnails

    Border Padding &pbw=Width and &pbh=Height
    • Width is the border (in pixels) applied to the width of the photo on both the left and right sides. The default is 10.
      This width should be used to adjust the photo sizes into a very wide BlurbBit. If you have a 600x250 BlurbBit, by default we will load the photo size to fit the 600 pixel width (they may be wide panoramics). Pad the width to match or you'll be downloading huge photos to fit. By default the Photo height will be 190 (i.e. 250 -30 -30) so a &pbw=200 will give approximately the same size, however you may wish to adjust the padding based of the aspect ratio of the photo for the best fit.
    • Height is the border (in pixels) applied to the height of the photo on both the top and bottom. The default is 30.
      Don't forget to take into account any ThumbNail size changes.
    Interactive Examples:
    &picalbums=SailBillabong
    The default spacing
    &picalbums=SailBillabong&pbw=50&pbh=50
    Increased border
    &picalbums=SailBillabong&width=600&height=250&pbw=200
    A wide album optimized

    Just a Photo Map : &pm=1

    In this case only a map of photo locations will be extracted, good for embedding in Blog sidebars. Adjust the Width and height to match your application. You'll automatically get a map with the standard BlurbBits above after selecting the photo view type, but sometimes it is hard to display all the photos in a sidebar. This one automatically loads and updates without interaction.

    We also sort the photos (by date, latest first) to make sure they appear in the correct order. Use the Picasa start-index parameter to begin with the correct photo.

    Interactive Examples:
    &picasa=SailBillabong&pm=1&width=220&height=200&mark=smallred&smark=smallred
    A map of the first 100 photos from SailBillabong (try your Username)
    &picasa=SailBillabong::start-index=100&pm=1&width=220&height=200&mark=smallred&smark=smallred
    Skip the first 100 photos from SailBillabong Picasa, start mapping at 100.
    &picasa=SailBillabong:Sailing2007&pm=1&mark=midredx&smark=smallred&width=220&height=200
    The Sailing2007 map from SailBillabong (try Sailing2004, Sailing2005, Sailing2006). The X mark represents the end of the year location
    &picasa=SailBillabong:BillabongAtSea:authkey=VtVRMtCavYI&pm=1&width=220&height=200&mark=smallorange
    The BloggerAtSea Blog Album map. Unpublished Albums require AuthKey shown in Album Url