Interactive BlurbsViewr Maps
Add a map to navigate your website or blog posts
Interactive maps have been around for ages but most people embed them directly into their page. This means that every time a user changes pages the map needs to be reloaded and built again.. and again.. and again!! If your map has a lot of data this can be painful and time consuming and the view changes during each reload losing the continuity you were trying to gain by adding the map in the first place. Maps can be made quicker by only having one location but then what's the point, why not use Static maps or a BlurbBit (two zooms + title) instead?
Now I'm sure you've also seen maps that allow you to navigate to other pages. They either stuff all the information in a tiny info window or open in another window or tab. To get to the actual page, you usually have to wait while the map adjusts the info window.. one click on the map icon, wait... , find the link in the info window and click it, find the tab.. uggh. I know because I used the exact solution for our sites.

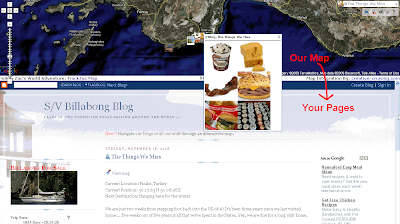
The BlurbsViewr opens your pages directly in a window below the map, allowing us to maintain the map while your site changes your pages. Users can navigate the context of the map and your pages quickly while maintaining continuity of the complete "picture". They can also find additional content nearby whether it's your own content, like photos or videos near the blog, or through optional layers like Wikipedia and Panoramio photos. Here's an example that ties ALL of our our sailing sites together: our SailBillabong.com Journals, Photos, You Tube videos and our svbillabong.blogspot.com blog. The map will open with a preview of our latest post and position automatically extracted from our blog.
Use the drop down menu list (top right corner) to navigate the content or just browse the map (instructions under ?). If you want just a page preview first, disable the Quick Link Option (under Map Type/Extras). If our photos don't do a good enough job describing the area or you want to learn more, enable the Wikipedia and/or Panoramio layers.
So there you have it, a full interactive map to navigate all your geotagged web pages and content. Please let us know what you think!!
Note: This map data was hand entered from our SailBillabong site while the latest blogs are automatically extracted from the Blogger feed data and it's BlurbBits. We can automatically map GeoRSS feeds, geotagged photos, and blogs posts/Web pages tagged with BlurbBits (that also support feeds).
If you use Blogger check out the GeoBlog mapping options and our Travel Blog process.
Geotagging data
If you have a feed (without geotags), try extracting the data with the BlurbBits Mapr and drag the entries into position on the map (don't forget about zoom). Save the data to the Mapr ScratchPad (text tab format) and upload it (or copy paste using Ctrl-C Ctrl-V) into a Google Spreadsheet. Share the spreadsheet and load it into the BlurbsViewr and you've got yourself a pretty cool map. That is the fastest way to get your non geotagged blogs/pages onto the map. Then you can use the data to add go back and add BlurbBits with photos and/or maps where desired (without them nothing extra will appear in your post or feed.. ie no links, photos etc). You can even combine the two, handling historical blogs with a spreadsheet while adding BlurbBits to your new posts.. the best of both worlds.
If your site doesn't support RSS feeds you can easily build a spreadsheet that contains all the data (I said easy NOT quick). The basics are the URL for each entry, a Label and a Description and Type (required). Photos are optional but enhance the preview and the chance that users might click through to the page (you can add these later). Check out the ScratchPad format and options and this sample ScratchPad data.
Url Parameters for BlurbsViewr
All of the data extraction parameters and are supported by the Viewr (&bp=1 is redundant). Online Photos parameters can also be used if they have geotagged data.
Other supported parameters
&mtitle=map title (see Basic Setup)
&mt=map type (see Customizing your map)
&mv=where will zoom map to latest entry at initialization (if location is defined)
&tt=travel Turn on the Trip Tracker
&mi=in|out Defines the initial map view (latest entry or all points)
&zoom=zoom Default zoom value for locations without a zoom
&llz= (initial location) good for highlighting an area of your trip but not a specific point (no marker is added).
&qlno=true disable quicklinks on initialization. Shows a preview first however it is important when custom maps are generated that do not contain URL links to pages (just popups).
