Create a BlurbBit
BlurbBits can be used in a standalone mode to create a photo gallery, describe your travel route and/or detail a location. If you have a blog or feed based website, we can use the individual BlurbBits to extract an image and location into a summary Journal/Blog map or Photo Album AND the BlurbsViewr for an interactive navigation map of your site. If your blog doesn't support native geotagging, BlurbBits are really just a cool way of adding Map locations and zoom levels to each Blog Post or Web Page while giving you something for your efforts. See Extracting Data for more details of the data extraction process and options. Make sure you start with BlurbBits Basics if you haven't already.
Why do I have to enter a position?
Actually you don't. BlurbBits can easily be used without it, however a location adds a map and gives the end user a chance to see the area/areas you are describing. Since each location also includes a zoom level, you can configure all sorts of maps: one that shows the entire world to another that shows the details of your house, apartment or boat location. What about geocoding? Geocoding will get you a starting position, but only you the writer knows exactly where/what area you are taking about. Do you mean Boston proper or the area surrounding Boston?
llz=42.35892,-71.05781,9
llz=42.35892,-71.05781,15
With the BlurbBits Mapr it really doesn't take that long to pinpoint exactly what area you are talking about and then you can add photos etc. Note: The BlurbsViewr requires position data to place entries on the map.
BlurbBits allows you to put your article, blog entry or webpage "on the map" while managing your photos in one central utility.
Create a BlurbBit:
BlurbBits are configured via Url Parameters appended to the Url Path of our basic utilities and sent through a standard webpage HTTP request.
ex: http://..../blurbbits.html?blogger=svbillabong&mtitle=Sample
The
Interactive Examples:
The easiest way to get used to something new is to try it. The BlurbBits documentation will be organized as follows:
Feature Name: &Parameter=Options
Clicking on the icon to the left of the text box will load the example into a BlurbBit in a popup window. If you expand the popup you'll see ../blurbbits.html?design=true&llz=36.2938,30.1497,12&mi=in in the Location Bar. We've automatically added the ?design=true but the rest is as entered above. The data gets passed to our WebSite so we can customize it especially for you, that's how the URL parameters work.
The example text is also available in an interactive text box that allows edits. Change the example and hit enter or click the icon and the changes will be loaded into the BlurbBit. If there are any issues you can always refer back to the original example above. The BlurbBit is in design mode so the publishing options will be available under the info (i) button. The &mtitle=Title option is used to title both the map and the webpage.
If you are anything like us, you'll skip the reference part and go straight to the examples, just make sure you understand any gotchas before you create too many BlurbBits.

Embedded BlurbBit in Blog Post

Interactive Example BlurbBit
Note: In certain cases the resulting interactive examples will appear slightly different in the popup than in an embedded version. In the embedded version you can designate a cover photo, which lives on the actual page it is embedded on and is not a part of the BlurbBit. As a result some of the interactive examples may appear "naked" since they are not embedded.
The examples all begin with the & sign for ease of entering into the BlurbBits Mapr. If you are entering these directly onto the URL path, make sure the first & is replaced with a question mark, i.e. http://www.creative-cruising.com/blurbbits.html?llz=36.2938,30.1497,12&mi=in.
Basic Setup & Publishing
BlurbBit title: &mtitle=Title
Width and Height: &width=Width and &height=Height
Design size considerations
The Design Size can effect photo load times dramatically. The default sizes were chosen to optimize the available photos, and the square shape supports both Horizontal and Vertical orientation. If only a map is used or the photos are in a single orientation, the width and height can be manually adjusted.
Publishing Options
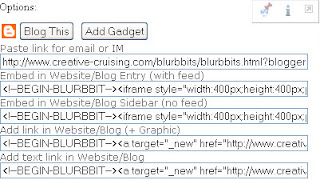
If you are using the interactive examples, first make sure the width and height are correct for your application (sidebar vs post). &width=400&height=400 works for a Standard Post and &width=220&height=200 works for the Sidebar. These values can be added directly to the interactive examples box if you need to change the default sizes. Select the i (info) button for the publishing options (design mode must be enabled).

Blogger users have it easy..
Note: Jan 08. We are investigating a Blogger editor bug related specifically to Internet Explorer version 6.* while using the Compose editor with Iframes (like BlurbBits). We HIGHLY recommend you upgrade to a newer/safer/faster browser like Firefox. BlurbBits published via the Add Link publishing option will not break the compose editor and All BlurbBits will display correctly. The Edit Html editor reportedly works fine.
Design Mode: &design=Mode
For all the interactive examples and the BlurbBits Mapr, the design mode is enabled.
This triggers a development mode that allows you to choose publishing options and set default sizes based on where the BlurbBit will be used. It can be used in a sidebar, footer or embedded into a blog post or website, you can even email or IM it.
Now What?
BlurbBits allows you to put your article, blog entry or webpage "on the map" while managing your photos in one central utility.
Create a BlurbBit:
BlurbBits are configured via Url Parameters appended to the Url Path of our basic utilities and sent through a standard webpage HTTP request.
ex: http://..../blurbbits.html?blogger=svbillabong&mtitle=Sample
The
query portion of the URI is used to define the key=value pairs. Each additional parameter is appended following an ampersand &, e.g.: ?key1=value1&key2=value2. The query string MUST begin with a ? (only one) or you will get "page cannot be found" errors. If there is a problem or missing portion of your BlurbBit, it is most likely in the parameter passing. These parameters can be added to the Location bar of your web browser or links you add to your page.Interactive Examples:
The easiest way to get used to something new is to try it. The BlurbBits documentation will be organized as follows:
Feature Name: &Parameter=Options
- Option: short description
More details etc
&llz=36.2938,30.1497,12&mi=in
Our Current Location (Try adding a title by add &mtitle=SVBillabong after in)Clicking on the
The example text is also available in an interactive text box that allows edits. Change the example and hit enter or click the icon and the changes will be loaded into the BlurbBit. If there are any issues you can always refer back to the original example above. The BlurbBit is in design mode so the publishing options will be available under the info (i) button. The &mtitle=Title option is used to title both the map and the webpage.
If you are anything like us, you'll skip the reference part and go straight to the examples, just make sure you understand any gotchas before you create too many BlurbBits.

Embedded BlurbBit in Blog Post

Interactive Example BlurbBit
Note: In certain cases the resulting interactive examples will appear slightly different in the popup than in an embedded version. In the embedded version you can designate a cover photo, which lives on the actual page it is embedded on and is not a part of the BlurbBit. As a result some of the interactive examples may appear "naked" since they are not embedded.
The examples all begin with the & sign for ease of entering into the BlurbBits Mapr. If you are entering these directly onto the URL path, make sure the first & is replaced with a question mark, i.e. http://www.creative-cruising.com/blurbbits.html?llz=36.2938,30.1497,12&mi=in.
Basic Setup & Publishing
BlurbBit title: &mtitle=Title
- Title: used as the map caption AND page title.
Special characters must be escaped i.e. use %20 for space - within the BlurbBits Mapr
The Mapr handles escaping of special characters
Uses the user defined label as the title if use label is selected
&llz=36.2938,30.1497,14&mtitle=Our%20Current%20Location
Adds a title to our previous mapWidth and Height: &width=Width and &height=Height
- Width: Measured in Pixels ex: 400
- Height: Measured in Pixels ex: 400
do not enter - If you are hand editing the results make sure you update ALL the references
These reference are passed to ensure correct reproduction in all the viewing options.
&llz=36.2938,30.1497,14&width=220&height=200
A smaller version of our map (for Sidebar)Design size considerations
The Design Size can effect photo load times dramatically. The default sizes were chosen to optimize the available photos, and the square shape supports both Horizontal and Vertical orientation. If only a map is used or the photos are in a single orientation, the width and height can be manually adjusted.
Publishing Options
If you are using the interactive examples, first make sure the width and height are correct for your application (sidebar vs post). &width=400&height=400 works for a Standard Post and &width=220&height=200 works for the Sidebar. These values can be added directly to the interactive examples box if you need to change the default sizes. Select the i (info) button for the publishing options (design mode must be enabled).

Blogger users have it easy..
Note: Jan 08. We are investigating a Blogger editor bug related specifically to Internet Explorer version 6.* while using the Compose editor with Iframes (like BlurbBits). We HIGHLY recommend you upgrade to a newer/safer/faster browser like Firefox. BlurbBits published via the Add Link publishing option will not break the compose editor and All BlurbBits will display correctly. The Edit Html editor reportedly works fine.
- Choose the
Blog Thisentry to add a new Post/Entry about your new BlurbBit. We even hide all the ugly HTML code for you, the [BLURBBIT] section is replaced with the actual code at publishing time. - Choose
Add Gadgetto add it as a gadget to the Blog (ie. Not a Post). By default the Gadget will appear in the sidebar. If you have configured the BlurbBit for a different location, drag the widget into place.
Note as of Nov 7, dragging was broken in the Add gadget window. Open the layout panel in a new window and drag it there. - To add a BlurbBit to an existing post, edit the post, select the Edit Html tab and paste the Embed in Website/Blog Entry (with feed) code into the desired location. If you are having a hard time finding where to place the code, use compose mode to MARK the code, ie. add XXXX. Then use the browsers search to find it in Html mode.
- For direct links, email or IM paste the URL link into your editor.
- For sites that allow Iframes AND have a RSS feed (like Blogger), choose the
Embed in Website/Blog Entry (with feed)option. This will handle both the post/web page and include a link (and optional photo) into the feed so others will have access to the BlurbBit. - For sites that allow Iframes but don't have an RSS feed use the
Embed in Website/Blog sidebaroption. - For sites that do not allow Iframes, choose one of the link options.
Design Mode: &design=Mode
For all the interactive examples and the BlurbBits Mapr, the design mode is enabled.
This triggers a development mode that allows you to choose publishing options and set default sizes based on where the BlurbBit will be used. It can be used in a sidebar, footer or embedded into a blog post or website, you can even email or IM it.
- Mode: one of the set {sm,med,lrg,sidebar,footer,true}
- sm: 250x250
- med: 400x400
- lrg: 500x500
- sidebar: 220x220
- footer: 600x200
- true: triggers the mode but doesn't define size
- sm: 250x250
- Within the BlurbBits Mapr
The Mapr handles the setup and allows a quick preview of various size options. - The examples are all configured with design mode enabled
Once a BlurbBit has been tested, it can be published via the options under the i info button.
You'll be using design mode in all the interactive examples.
Now What?
- Check out our getting started overview (BlurbBits and utilities).
- Learn about the geoblogging process (step by step overview)
- Learn how to create BlurbBits using an interactive map (the BlurbBits Mapr).
- Learn how to use online Photos (i.e. Picasa or Flickr).
